As teachers, we are well aware that one size does not fit all in education. We know the value of differentiation and personalized learning plans. We want to meet students where they are and provide each of them with the most effective learning plan possible. Yet the pressures of limited time and resources often funnel instruction into a plan that shoots for the middle, amid hopes that learners at both ends of the spectrum can adapt and find success. More often than not, however, some students are left confused and lost, while others tune out because they are bored with content that is too easy or repetitive for them. What is best for students gets lost in the reality of what is practical and doable.
Does this mean that we should give up and abandon the practice of differentiation? Absolutely not. Despite the pressures and constraints we face as educators, our students depend on us to give them the best learning experiences possible. Fortunately, technology is continually evolving and providing us with effective differentiation solutions that were not available in the past. Strategies that were once just a dream are now much more attainable through the power and efficiency of technology. In fact, by leveraging tech tools and programs in an intentional and meaningful way, we can do more than differentiate instruction. We can accelerate learning as well. After all, when students get what they need, when they need it, and in a way that matches their preferred learning style, they are able to learn more and at a faster rate. In many ways, differentiated learning is accelerated learning, and we can achieve this if we lean on the power of technology.
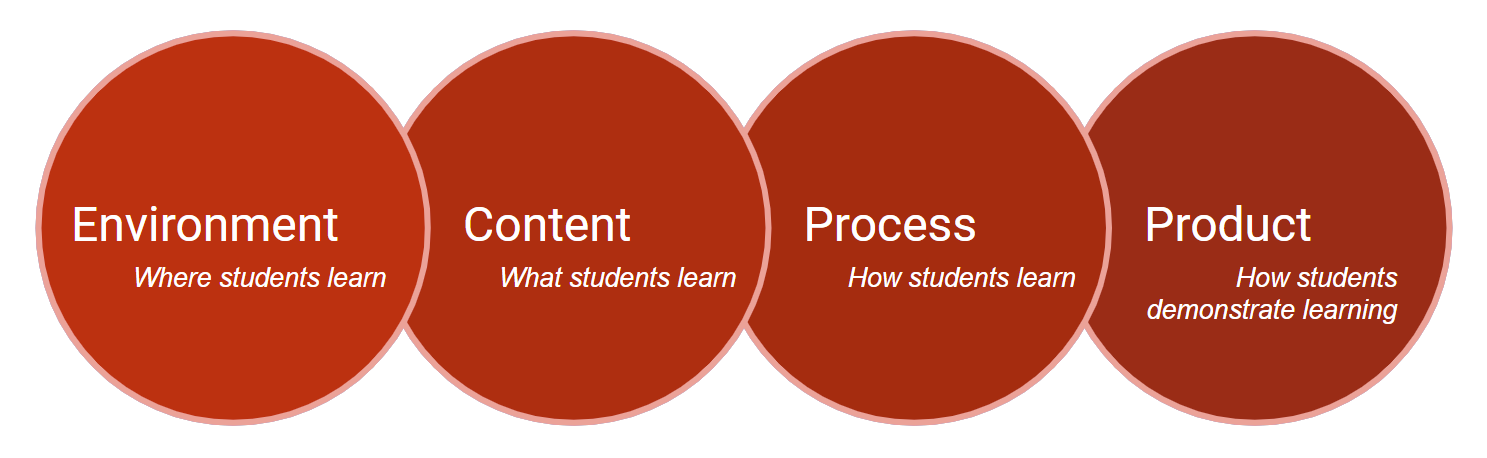
4 Areas of Differentiation
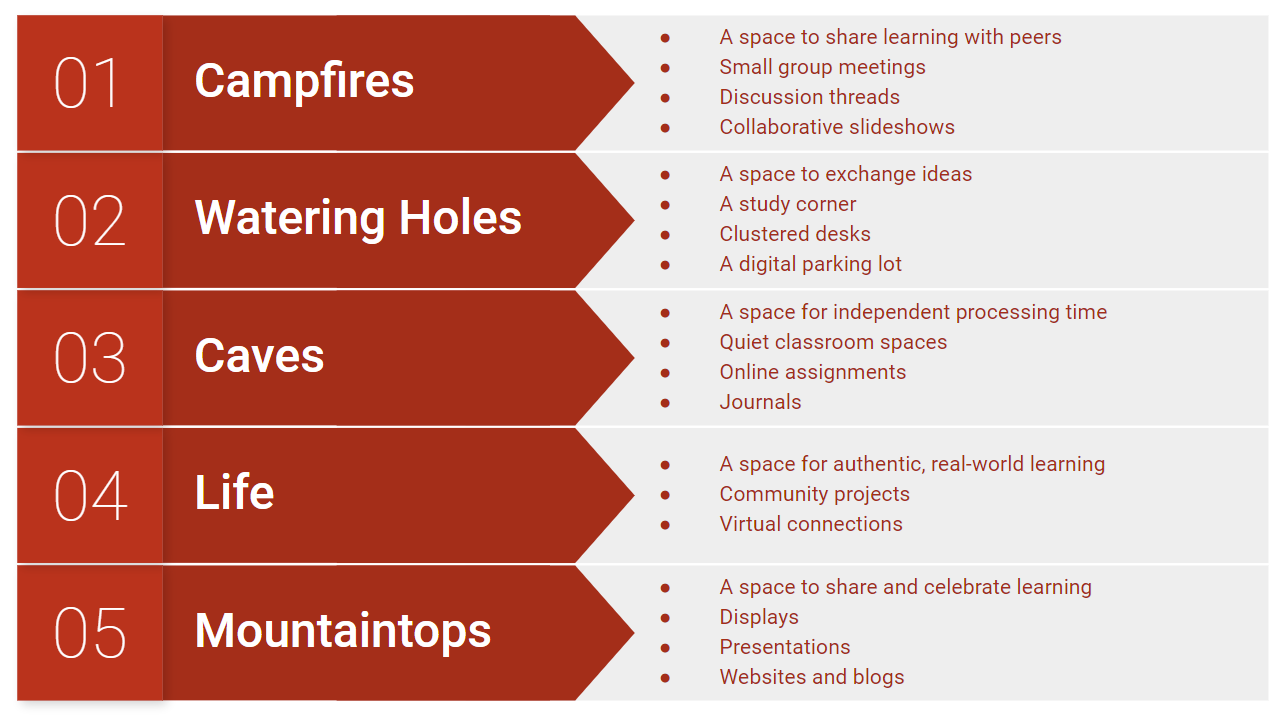
In this area of differentiation, consider where learning happens. Not all students are equally comfortable in every learning space. In fact, sometimes a learning space can trigger anxiety and shut down a student’s learning process altogether. In order to maximize student success and accelerate learning, offer a variety of learning environments and provide as much choice as possible so that students can learn in the space where they are most comfortable. Education technology leader David Thornburg breaks classroom learning spaces into five metaphorical categories. Consider these when designing your learning environment, and consider the role technology can play in creating these learning spaces. These learning spaces can be both physical and digital.
- Campfires: Campfires are spaces in the classroom where students can come together and share stories and learning with each other. Generally, an expert or lead student takes a turn sharing their ideas with a group of other students. This gives student voices value, and the exchange of ideas can be both impactful and motivating. It’s also a great place for student presenters to get feedback from their peers.
- A small group meeting: Organize opportunities for students to meet in small groups and take turns sharing ideas. The whole class could do this at once, or students could rotate through a campfire station during station rotation. You can also intentionally structure campfires by using a jigsaw strategy wherein students first meet in “expert groups” and then teach their assigned concept back to a “home group” of students.
- A class discussion thread: Set up a discussion thread where students can share their ideas and respond to others in a common digital space. The benefit of online discussions is that they are asynchronous, which allows students to join and add comments when they are ready. Of course, it’s helpful to set some deadlines in order to give students guidance as well as motivation for contributing. Often, it is helpful to require deadlines for both the initial post and replies. This helps ensure there will be posts available when students go to add their responses. Explore more student discussion tips in the AVID Open Access article Foster Substantive and Respectful Online Discussions.
- A shared, collaborative slideshow: By setting access permissions to allow anyone with the link to edit, you can set up a virtual campfire space in a digital slideshow. Each student can create a slide that shares new learning and information with others in the class. Since all students have access to the slideshow, they can learn from each other virtually.
- Breakout rooms: If you are teaching remotely, you can use breakout rooms as campfire spaces. Either assign all students to breakout rooms at once or rotate them through on a schedule.
- Watering Holes: In this environment, students gather together like they do at campfires. However, watering holes are usually less formal than campfires, and the exchange of ideas is more free flowing. It is less about one expert sharing ideas and more about informal collaborative conversations and brainstorming. In fact, true watering holes are not run by the teacher. They are incidental conversations that occur when students happen to find themselves in a common space.
- A study corner: Create a space in the corner of your classroom where students can meet when they want to collaborate and share ideas. You may want to have the class generate protocols for this space so it doesn’t become a distraction while students are working elsewhere in the room.
- Clustered desks: While there need to be boundaries on when it’s okay for students to engage in conversation, arranging desks in small clusters can facilitate academic discussions and peer networking. If students are working on a common assignment, they can bounce ideas off each other and ask questions.
- A digital parking lot: This is a place where students can post their ideas and questions and other students can respond when they have time. Set this up as a discussion post in your learning management system or link to a Flip (Tips). Students can post their questions and responses as text, audio, or video.
- Caves: Sometimes students need individual time to process, reflect, and study on their own. Caves are learning spaces where students can have some degree of quiet and privacy.
- Quiet classroom spaces: Sometimes, this means that all students are quiet at the same time. They might be working at their desks or allowed to find a comfortable space somewhere in the classroom. Other times, teachers will set up physical caves in the room. This could be a small divider in the corner that students can sit behind or a small tent that a student can crawl inside.
- Online assignments: Cave assignments allow students to complete their work privately. This might be done on a Google or Word document using their school account, or it might be an assignment that is submitted in a learning management system and seen only by the teacher.
- Journals: Paper or digital journals are great cave areas and provide opportunities for self-reflection. These may be kept private and used as a place to process learning, or they might be shared with the teacher. You might even allow students to mark some entries as private, cueing you to skip over that entry. Another strategy is to have students mark two to three entries for you to read, and you can just check off the others as completed. For journals to be a cave, however, students should not be required to share this work with their classmates.
- Life: This space breaks from the metaphor a bit, but it’s very powerful. It refers to learning that happens in the real world. If your students are engaged in project-based learning or inquiry learning, they will have a chance to learn in this space. This learning is authentic and student-driven.
- Community projects: In these projects, students physically leave the classroom and apply their learning in a real-world context. This might occur during a scheduled class field trip, or it could happen outside of class time. Community can be defined in many different ways. It can be the school community, the larger city community, or even a family community. Your choice will almost certainly be determined by the age of your students and options deemed acceptable by school or district guidelines. Be sure to find out what is acceptable before beginning a community project.
- Virtual connections: When students don’t have opportunities to physically visit a learning space beyond their classroom, they can leverage technology to connect. This can include email, blogs, websites, videoconferencing software, and virtual field trips. Explore AVID Open Access resources for how to break down the walls of the classroom. Again, check with school policies and expectations before setting up virtual connections.
- Mountaintops: Think of these as spaces to celebrate learning. Essentially, they allow students to “shout it from the mountaintop” and let others know what they’ve done. These are spaces where students can share publicly, present, or publish their work. For celebration ideas, check out the AVID Open Access collection about honoring students and celebrating academic milestones. Many of the strategies shared in that collection can be integrated into the mountaintop spaces listed below.
- Displays: Set up an area of your classroom, the hallway, or other common location in your school where students can display their work. This gives them an authentic audience, which can motivate them to produce something they are proud of. This public audience shifts motivation from receiving a grade to receiving authentic feedback and praise. You might even have students record a video of themselves explaining their work, then put a QR code to the video next to the displayed items. This allows visitors to scan the code with their phones and learn more about the project. There are many free QR code generators available online.
- Presentations: Have students share their work with the rest of the class. This can be in a full class presentation or in small groups. Presentations that are designed on digital slideshows can be shared virtually. These are great learning artifacts to share at parent-teacher conferences.
- Websites and blogs: By publishing work to a website or blog, you can extend student work beyond your classroom walls and allow students to get feedback from audiences other than their classroom peers. Explore school and district guidelines for sharing student work in this way. Based on local policy, you might need to limit who can see the site, and you might need to get parental permission. Many educational tools, such as Google Sites and Seesaw (Tip Sheet), allow you to limit who can view the online pages.
This is the “what” of learning. While you will likely have required grade-level standards that all students must target, not all students will be in the same place on their learning journey. Some students might not have mastered prerequisite standards from last year, while other students might have already mastered the standards you plan on targeting this year. Whenever possible, differentiate the content so students are getting what they need when they need it. You don’t want students to be bored or to be overwhelmed. Use the Goldilocks approach and find the learning that is “just right” for each learner. Here are a few tips to help you get started differentiating content.
- Target priority standards: Priority standards are the learning targets that will be most important for future learning. Without these, students will struggle in later units and courses. Make sure learners master these first.
- Target prerequisite standards: Like priority standards, students need these skills to be successful with future learning. The difference here is that these are standards that students should have learned previously. If there are gaps in prior learning, target prerequisite standards first. Once these have been achieved, move learners on to grade-level content.
- Just-in-time support: Rather than reteaching the entire class prerequisite standards, only reteach those who need this support, and offer that instruction at the time of need. This will maximize the relevance of the material, improve motivation, and increase the odds that students will remember the new learning, because they will be applying it immediately. To learn more about this approach, explore the AVID Open Access article Accelerate Learning by Prioritizing Outcomes and Providing Just-in-Time Support.
- Provide scaffolds and enrichments: If you can, have a collection of scaffolds and enrichments ready for students who need them. These can be stored in a learning management system and pulled out at the point of need. You can also choose to make these available for all students. That way, students can self-select when they need them. Scaffolds might include YouTube videos that reteach a concept, graphic organizers that help organize thoughts, and links back to websites or online textbook pages that help explain the concepts. For enrichment ideas, explore the strategies embedded in the AVID Open Access articles Accelerate Learning by Maintaining Academic Rigor and Cognitive Complexity and Accelerate Learning By Climbing Mountains.
- Pre-assessments: Pretests and other forms of pre-teaching assessment can help identify skills students already know. This will allow you to move these students forward without spending time on concepts that they have already mastered. Similarly, use these assessments to identify prerequisite standards that might need reteaching or reinforcement from previous learning. Without these core skills, students will struggle. The pre-assessment will help you identify who needs help with which concepts. Digital tests can be especially efficient because they score the results automatically, giving you more time to examine the data. Of course, not all assessments are tests. Explore the AVID Open Access article Accelerate Learning With Meaningful, Targeted Assessment for additional ideas and strategies.
- Universal design: Essentially, universal design is an attempt to ensure all of your students can access the resources and learning experiences you are providing. Poor reading skills should not be the reason a student struggles in math. Poor typing skills should not hamper a student’s language arts performance. Therefore, whenever possible, offer your materials in multiple formats: text, video, audio, interactive websites, simulations, etc. This will give students multiple pathways to the learning. You can also offer assistive technology tools to those who need them, like translators (Google Translate, ImTranslator) and screen readers (Read Aloud—Tips).
- Leveled reading: Several digital reading websites have become popular in recent years. These sites provide differentiated, leveled versions of text passages so students can access the content at their own level of proficiency. The reading level changes while the content stays the same. This is a great way to ensure all students can access the academic content. Popular online tools include Newsela and ReadWorks.
Process refers to how students make sense of their learning. This is where students practice, apply, and understand new learning. Since not all students learn effectively in the same way, it is helpful to provide multiple options for how students can process information. Sometimes this might mean guiding all students through a variety of synchronous processing activities, and other times it might mean giving students a variety of asynchronous choices. When students are given a choice, they can self-select their preferred method for processing and practicing their learning. If you allow students to self-select, consider helping them determine and understand how they learn best. This will help them make intentional and well-informed choices rather than simply choosing the path that they think will be easiest. You can even ask them to explain their choice to you to make sure they give the decision thoughtful consideration. Often, students will benefit from a combination of online and offline approaches. If you use choice boards or playlists in your classroom, you can offer these options in a checklist or tic-tac-toe format. Templates are available for you to customize as needed on AVID Open Access. Here are a few areas where you can offer students choice when differentiating the processing stage of learning.
- Independent, partner, or group work: This overlaps a bit with environment, but it also speaks to the “how” of processing. For instance, if students are working on a new math concept, they might work through the problems in one of these three settings. They can achieve the outcome with each of the options, but the degree of interaction and collaboration will be significantly different.
- Written or recorded: Some students are not great writers, and the process of writing can get in the way of new learning. By allowing them to choose between writing and recording their thoughts, students are permitted to select the least restrictive way for them to communicate and process their new learning. Similarly, some students may benefit from speech-to-text (Google Voice Typing) and text-to-speech tools (Read Aloud—Tips).
- Note-taking formats: If you ask students to take notes, offer them a variety of note-taking formats and graphic organizers. Then allow them to choose one that fits their learning style best. Some students may prefer taking notes on paper while others like to word process their ideas. Some write down mostly text, and others prefer images and sketch noting. Regardless of the option students choose, it can be helpful to reinforce a formal digital note-taking process so that students reflect and review intentionally. Learn specific strategies in the AVID Open Access collection about focused note-taking.
- Physical or digital: Some students prefer a hands-on approach. They like manipulating physical objects. Other students may lean toward virtual simulations like the science and math manipulatives, available at the PhET site (Tips). When possible, offer students choice in how they practice. Virtual manipulatives may also be helpful for students who are absent or learning remotely.
- Online or offline discussions: You can allow students to share and discuss ideas either in person or through an online discussion forum. For students who need more flexibility in pacing, online discussion boards can be a good choice. Even within these platforms, you can offer choice by allowing students to post either text or multimedia recordings.
The product is how your students will demonstrate their learning, and this is a powerful area of differentiation. While a multiple-choice test might be a popular and convenient assessment option, it may not always be the best fit, and it seldom offers much in terms of differentiation. In fact, a common assessment is, by its own definition, undifferentiated. It’s common, or standardized, rather than adapted to each learner’s need. When possible, provide students with options for how they will show what they know. Authentic assessments are often the most differentiated form of assessment.
- Projects: Allow students to demonstrate their learning by creating something. Learning artifacts can be analog or digital. Before students begin, provide a rubric with clear expectations to help guide them as they create. Projects allow students to lean into their personal areas of expertise and interest, and this can increase relevance, effectiveness, and motivation. Explore a variety of student creation options in the AVID Open Access collections Empower Students Through Creativity and Choice, Engage Students Through Inquiry Learning, and Inspire Students With Project-Based Learning.
- Portfolios: The beauty of a portfolio is that it includes multiple learning artifacts in one package. Sometimes, it even includes multiple practice opportunities and evidence of failing forward. It can be empowering to allow students to collect multiple samples and then select the best one to be graded. This requires them to think critically about what they’ve created and evaluate which attempt has been most successful. When working with younger students, you can encourage them to pick out their “wow” work. Students can use portfolio platforms like Seesaw (Tips) to collect these learning artifacts. Older students can also curate digital portfolios by creating a website or using shared folders in an online storage platform like Google Drive or Microsoft OneDrive.
- Verbal explanations: Some learners are verbal learners and need to talk out their learning. You can have an in-person conversation with a student, or you might allow them to record their ideas and submit them as a paper, video, or audio recording.
- Discussions: Some students prefer to have a conversation with their peers about their learning. Online discussion forums can be great tools for facilitating this digitally. You could also organize in-class discussions, Socratic Seminars, or Philosophical Chairs to provide discussion opportunities.
- Models: Students can be allowed to create a physical or digital model that represents their learning. For example, students might create an annotated model of a cell for a biology class or an interactive map showing the historical migration of a population of people for social studies. If you wish to better understand the thinking behind what has been created, you can ask them to include a narrative of some type to accompany the model. This will help them think metacognitively about the work they’ve done as well.
- Tests: Consider how tests can be modified for students with IEPs or who need some type of accommodation. Digital testing platforms can be especially helpful when you need to modify a test. In some learning management systems, you can create a test bank that allows you to pull questions of differing difficulty into different versions of the test. With a few clicks, you can create leveled tests. In addition, you can usually copy a test and make modifications to individual questions. Because it’s digital, this can save you lots of time and make it simple and efficient to create a modified version. Another advantage of digital tests is that you can leverage enhanced question types that may be more authentic than a true/false or multiple-choice question. These question types often include drag and drop, highlighting, drawing, clicking visual hotspots, and more.
By designing instruction that differentiates in these four areas, you will be creating the optimal conditions for accelerated learning in your classroom.
Connect to AVID
- Strategies for Scaffolding: Included with this resource are some of the most widely used strategies to provide scaffolding for students.
Extend Your Learning
- Five Elements of a Positive Classroom Environment for Students Living With Adversity (ASCD)
- What Is Differentiated Instruction? Examples of How to Differentiate Instruction in the Classroom (Resilient Educator)
- 6 Strategies for Differentiated Instruction in Project-Based Learning (Edutopia)
- Enhancing Learning Through Differentiated Technology (Edutopia)
- Top EdTech Tools for Digital Differentiation (NEO Blog)