Online discussion threads are a powerful and versatile engagement platform. They are widely used during remote learning and can give students a space to both express themselves and collaborate virtually. However, for some students and teachers, online discussions will be a new experience. Consider the key differences when making a transition to online discussions.
Face-to-Face
- Everyone hears comments at the same time.
- Conversation is linear.
- People see nonverbal cues (like facial expressions) and hear tone of voice.
- There is little time to think before responding.
- Conversation is limited to class time.
- People must be in one physical space.
- Teachers can quickly respond and intervene in person.
- It is easy to adjust the prompt at any time and refocus the conversation.
- There is a limited record of what has been said.
- Some voices may get drowned out by more outgoing participants.
- These discussions can be spontaneous.
- Communication is usually spoken.
Online
- Comments are heard or seen at different times.
- Comments may be heard or read out of order.
- There are no nonverbal or vocal cues (although emojis can help ).
- There is much more time to process.
- Conversation can extend over days.
- People can be anywhere if they have Internet.
- Teachers may not see a comment until much later and must respond virtually.
- Changing the prompt for a discussion in progress is difficult and may not be practical.
- There is a permanent record of what has been posted.
- Everyone has an equal voice and opportunity to respond.
- These discussions must be planned and posted ahead of time.
- Communication is usually through text or video.
If you find this comparison helpful, consider reviewing this table with students, as well, so they understand the differences between the two types of discussions. This anchor chart activity may be used to have students actively develop the chart with you by determining to which category each descriptor belongs.
As you consider your options, remember that there are advantages and disadvantages to both modes of discussion. As the teacher, you have control over which strategy is best for your situation. Sometimes, you might want to combine the two approaches by preloading a face-to-face discussion with an online one. This allows everyone some valuable, private think time before sharing out in person.
With thoughtful planning, you can help your students successfully transition from physical to virtual discussions. The “4 Steps to Successful Online Discussions” can help you get started and can be applied to any virtual discussion format (text, video, audio, etc.).
4 Steps to Successful Online Discussions
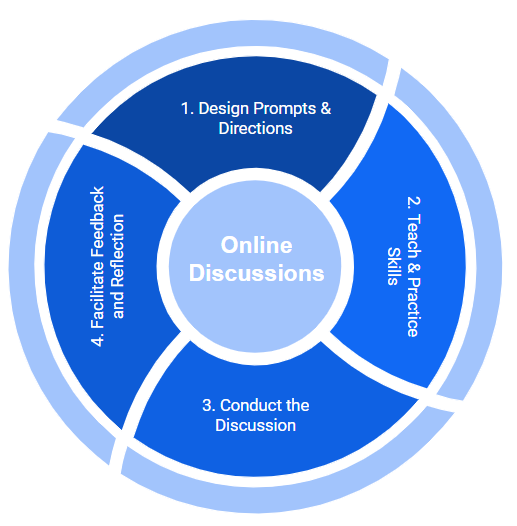
Create Prompts
- Your prompt is your discussion question. Be sure to word it carefully, as it is much more difficult to identify and redirect misunderstandings later.
- Construct a prompt that goes beyond a simple answer and allow for diverse viewpoints. Some possible ideas include the following:
- Offer a perspective (and explain it).
- Brainstorm collaboratively (add your idea).
- Offer a potential solution to a problem (and why it can work).
- Evaluate something (and defend your position).
- Debate an issue (with evidence).
- Offer personal experiences (use as evidence or examples to support a point).
- Predict an outcome (and explain your reasoning).
- Pose a question (and answer others).
- Be sure that there is context for the prompt. Will students understand the question? Do you need to provide some background information first? Consider embedding videos or links into the discussion to help inform the conversation and stimulate thought
Include Directions
-
- Include your directions with the prompt and be very clear. Include what, how, and how much to post.
- Provide a timeline for posts and replies. One common practice is to require an initial post by a certain date and then responses by a second date.
- To help build community, encourage students to respond to posts without responses first. Another option is to assign each student a “response buddy” or two.
- Develop a consistent and clear format to use with each discussion post.
- Indicate if replies are allowed, expected, or required. If so, how many?
- If you plan to grade the discussion, be sure to share this criteria with students. Some platforms will allow you to digitally grade by points and/or rubrics.
Teach
- You will need to be intentional about teaching your students online discussion skills. This experience may be new for them, so it’s better not to expect that they will already know how to do it well.
- Be sure that students know how the technology works. Do they know how to post and reply? Do they know how to use options for formatting and including media in their post, and do they know when they might benefit from using these options?
- Establish expectations and protocols.
- Respond with AVID’s Heart and Brain Feedback protocol.
- Provide sentence stems to help students get started.
- Provide reply structures.
- Describe something positive in the post.
- Specifically identify what you are referencing (consider quoting a section).
- Post your reply to the cited section. (Be mindful of the Heart and Brain Feedback protocol.)
- Provide evidence to support your position. At upper grades, you can even require students to post some sort of textual evidence or research with links to support their comments.
Practice
- If you have students face-to-face in your classroom, consider conducting the first discussion while students are all together in person. This can allow you to answer questions as they arise. This extra support can help set students up for success when they do the next one independently away from school.
- Set up some practice discussions with fun topics, as this will not only allow students to practice new skills, but it can also be a great way to build classroom community. For example, have students post an introduction of themselves and then ask follow up questions to learn even more about their classmates.
- Join in! Participate in these practice discussions as a way to model exemplary behavior. It can even be a good idea to submit the first post as a model. They can then see how you have done it. Once students demonstrate improved skills, you can reduce your involvement. Be aware of how much you are involved, as you don’t want to dominate or overly influence the discussion when modeling.
- Intervene quickly if you see something that could be hurtful and communicate privately with the student(s) involved. You want this to be a safe space. Most platforms will allow the teacher to delete posts.
Set It Up
- Make sure that the technology is set up and ready. Is your discussion published and accessible to your students?
- Remind students of the strategies and skills that they have practiced and prepared.
- Go over the directions in person the first time (if possible), and then have students do the actual discussion independently away from class.
Participate
- As with the practice sessions, the teacher should continue to monitor discussions to make sure that students are developing good online discussion habits.
- If you see a clearly inappropriate or hurtful response, delete it. Most LMS platforms allow the teacher this level of control. Then, follow up privately with the student who posted the inappropriate comment.
- The teacher can also continue to participate in the discussion to model exemplary behavior. However, if teachers participate, they should not be the source of answers. Let students do the majority of the thinking.
- The teacher should reply to student posts that have no responses. Make sure that no one feels ignored or left out.
- Repeat! Do not make an online discussion a one-time event. Conduct discussions repeatedly. Students will need that practice in order to improve their skills.
During the Discussion
- Continue to offer subtle feedback during the discussion by redirecting when necessary and affirming exemplary posts.
- If you have a significant concern about a student, reach out with a private communication system, such as email, LMS messaging system, etc.
After the Discussion
- Have students reflect on their participation. What went well? What can they improve? Consider giving them a rubric or list of criteria to consider. You might also encourage them to set a goal for future improvement.
- Provide teacher feedback to each student. This might be a formal grade (points or rubric) or a personalized, formative comment. Be sure to emphasize the positive behaviors.
- Have a whole-class discussion about the process and allow students to ask questions or pose suggestions to make the system work better for the entire class. Be sure to remind students not to mention specific names when improvements are suggested.
Extend Your Learning
- Encouraging Productive Online Discussions (Wake Forest University)
- Bring Meaning to Online Discussion With Intentional Design (Online Learning Consortium)
- Generating Effective Questions (Edutopia)