Congratulations! You have written, revised, and polished your writing, and it’s now time to share the results of your hard work with others. While you might decide to publish in a print format, digital tools open a vast array of new opportunities for publishing, and there are many free options. The most popular digital formats for publishing writing are detailed in the AVID Open Access article, Think It, Write It: Creative Writing Across the Curriculum. In that article, you will find information about publishing blogs, websites, digital books, and more.
This final stage of the process can be exciting because by publishing your work, not only can others learn from you, but you can also learn from the authentic feedback that you receive from them. This feedback can turn into a conversation about your work and can help you improve your craft for the next time that you undertake a writing project.
While the writing itself is finished, there are still a few tasks involved in the publishing stage. Some of these tasks may have already been completed during earlier steps, and some may still need to be addressed before it’s ready for others to see and read. A few additional tasks will only occur once your work has been made public.
Formatting
This task is similar to the polishing stage. In fact, you might have already found yourself perfecting the formatting while you were fixing mechanical errors. When reviewing the formatting of your project, consider the key questions below.
How will your writing be shared?
This is an important question, and it will guide many of your formatting decisions. If your writing will be printed out on paper, you’ll need to make sure that it comes off the printer in a clean, readable format and with appropriate margins. If the pages will be bound, you might need to provide extra room for the binding on one or both margins. On the other hand, if your writing will be published online, you will want to make sure that the fonts, colors, and hyperlinks appear as you intend them to be viewed. For instance, stick to a limited number of fonts (three or fewer) and consider which overall font type you will use. Sans serif fonts (like Arial) have clean lines and are considered to be more readable when you are using digital formats. Serif fonts (like Times New Roman) have little tails or embellishments at the ends of each line and are considered easier to read when the text is printed.

Think big picture, as well. Ask yourself if the digital site or resource is set up the way you want it. Overall, consistency is the key here. No matter what style you choose, stick with the same overall look throughout your entire publication. This will give your work a more polished and professional appearance. In fact, professional publications often use a common style sheet to guide these formatting decisions and to make sure that everyone on the team does it the same way. You might want to consider developing a style sheet with your students in your classroom. Not only will such an activity emphasize the need for a consistent style, but it will also give your students valuable ownership in the process.
What are the technical requirements?
This can be an important question for both print and digital publications. If your file will be printed, in what format do you need to save your file so that the printer can use it? For instance, professional print shops may want images saved in CMYK color format (cyan, magenta, yellow, and black), whereas online publications often favor RGB images (red, green, and blue).
You will also want to determine how your digital files will be shared. Will they be uploaded, emailed, or shared another way? Is there a file size limit? Documents with images or videos embedded in them can quickly become very large in size, and these may be too large to email. If the file size gets too large, you can upload them to an online storage system—like Dropbox, Microsoft Teams, or Google Drive—and then share a link to the file. This can be a helpful workaround for many file size limits.
Finally, you will want your digital products to be as “device agnostic” as possible. This means that the files can be opened and viewed accurately on any device. For example, PDF and HTML files are considered to be very device agnostic and can be opened in almost any web browser or device. Other document types might require specialized software to open and edit. Additionally, some fonts are unique to a tool or platform and may not display on other devices. Be sure to preview your work on multiple platforms, if possible. Fortunately, overall cross-platform compatibility is consistently improving, and some tools (like most website creation tools) let you preview the display on different screen types right within the program.

Have you chosen the correct digital share settings?
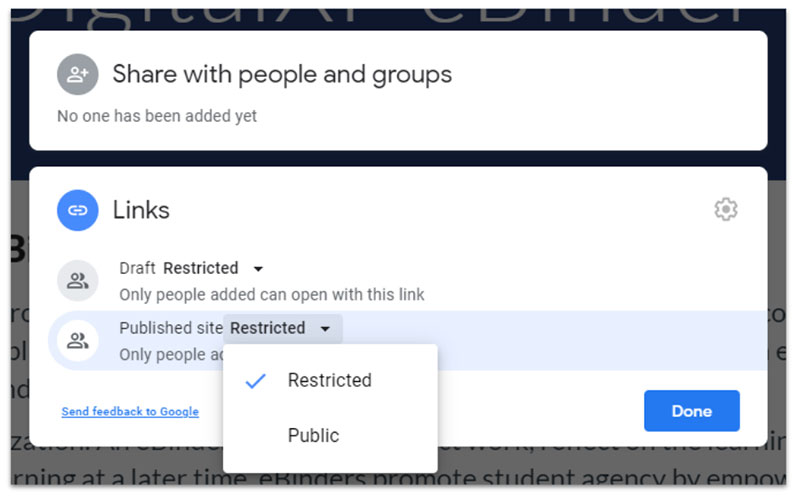
If you are publishing your work on the Internet, who do you want to see it? Is this something that is only for people within your school network, or is it something that you want published publicly to anyone on the Internet? Be sure to consider the Children’s Online Privacy Protection Act (COPPA) and school district guidelines. You may need parental permission to publish work publicly on the web. Some programs are more classroom friendly than others and will allow you to share publications with only specific email addresses or connected accounts. For instance, Google Sites gives you the option to restrict viewership to specific email accounts, to a local domain, or to anyone with the link. Choose the setting that is most appropriate for your situation.
Does your publication meet accessibility standards?
In addition to choosing the proper sharing settings, also be sure to consider other accessibility elements. For instance, if you are publishing online, do your images include alternative text (which is recognizable to screen readers)?
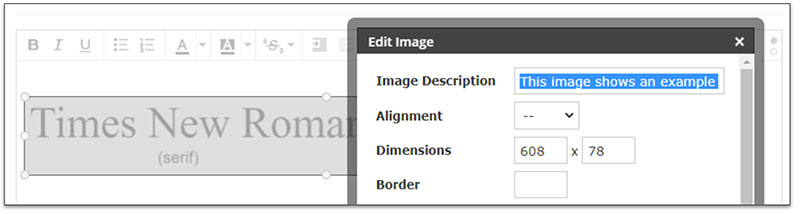
In the example illustrated in the image below, the designer chose a setting to edit the image. In the pop-up window, the alt-text field is titled “Image Description.” To make this more accessible to users with screen readers, the writer included the following sentence in the description field: “This image shows an example of Times New Roman font (serif with little tails on the end of each letter) and Arial (sans serif) with a clean design.”
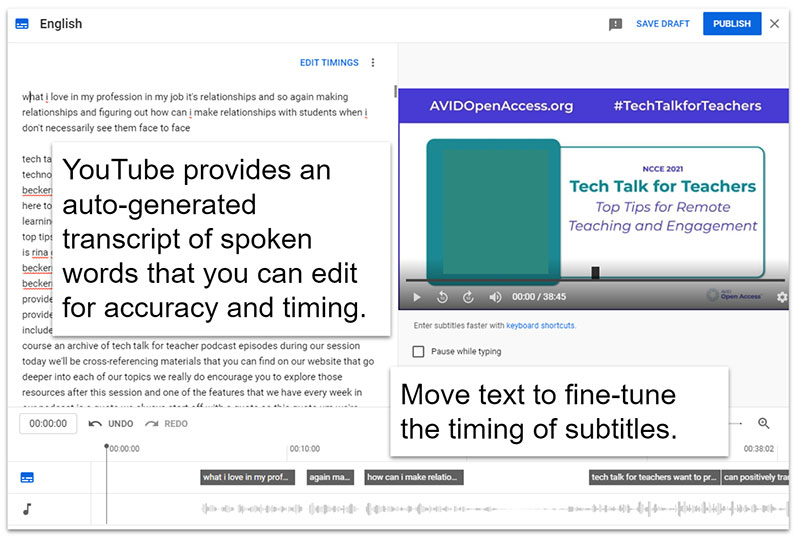
Do your videos include closed captioning so that those with hearing loss can still capture the message? Are your color choices appropriate for those with color blindness? These considerations will help to make your work ADA (Americans with Disabilities Act) compliant, while enabling more people to fully access your content. The image below shows the subtitle editor featured in YouTube. The auto-closed captions generated by YouTube will get you close, but you will want to enter the editor and correct errors in capitalization, punctuation, and word choice. If needed, you can also realign any subtitles to a more appropriate location in the video and add additional text, such as annotations for speaker names and background sounds.
If you are interested in learning more about accessibility, review the AVID Open Access collection, Design With Accessibility in Mind.
One Final Check
When we’ve been working on a project for a long time, we can become attention fatigued. We might find ourselves more interested in being done than we are in catching one more minor imperfection. If you find this happening to you, it’s time to take a break and put the project aside for a while. Then come back later—even after a day or two—and look at it with fresh eyes. You’ll be amazed at the details you notice. A related strategy is to use a screen reader—like the Read Aloud (Tips) Google Chrome extension—to hear your work read back to you, or you might record yourself reading the text, and then listen back to it. This new way of experiencing the content can provide a novel and fresh perspective.
If your work includes hyperlinks, click through your project randomly to test them out and make sure that everything is working as you intended. It’s a good idea to test out digital publications in different browsers since they each behave slightly differently. Similarly, view it on different types of devices. Some sites automatically reformat the view for computers, phones, and tablets, while others do not. For the best user experience, you will want to make sure that your work looks good and functions smoothly on all types of devices.
You might also want to have someone else glance through it to see if anything catches their eye. They probably won’t look at it as critically as you have been, but a fresh perspective can catch glaring mistakes that you will surely want to clean up before it goes public. For best results, find someone who has not yet seen your project.
Publishing to Your Intended Audience
This is the moment that you’ve been working toward. It’s time to unveil your work to a real audience. This might mean distributing a printed copy of your work, or it might mean clicking the publish button on your website or online publication. However you are sending your work out into the world, take pride in it and feel good about the hard work you’ve poured into the project.
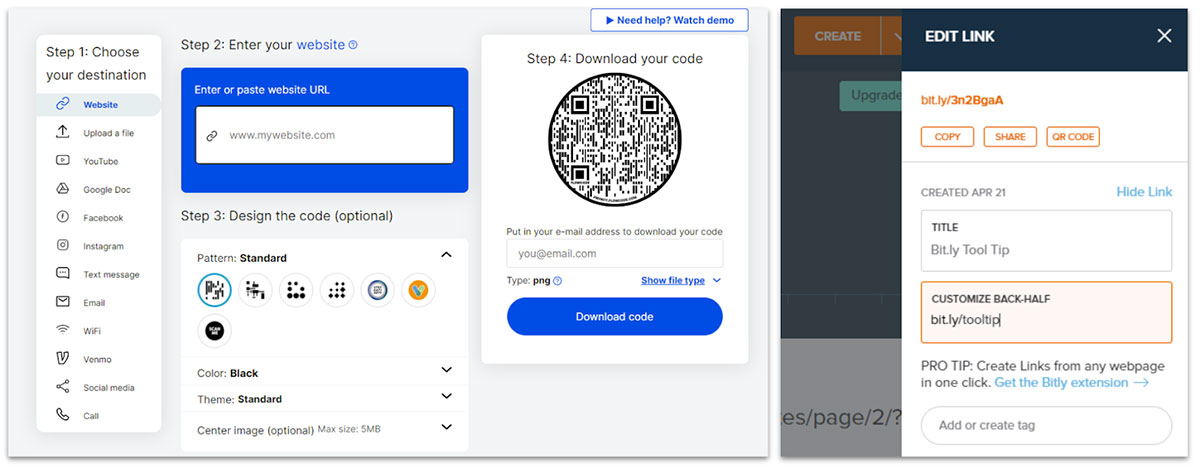
You know the saying, “If a tree falls in the forest and nobody hears it, did it really make a sound?” The same might be said of writing. “If no one reads what we’ve written, did we really say anything?” After all of your hard work, it would be a shame for no one else to read it. Therefore, consider how you can amplify what you’ve written. If you wish to keep the publications within a closed school network, consider how you can advertise it among your colleagues. You could collaborate with other teachers around how to best to get messaging out or have your students hang up posters with QR codes or short URLs. This can be a great way to display work at parent–teacher conferences or open houses. That way, parents, guardians, and family members could use the built-in QR scanners in their cell phones to quickly scan and see your work. There are many QR code generators freely available online. Two popular websites are Flowcode and QR Code Generator. If you choose to create short URLs to more easily share your work, Bitly (Tips) is one option. With a free account, you can create custom URLs that are shorter and much easier to remember.
If you’re working with older students, and you have permission to publish beyond the walls of your school, consider advertising on social media. Social media has become one of the premier ways to push work out to a broader audience. Twitter, Instagram, Facebook, or any other platform where you have connections can reach a large audience in a short amount of time. But again, before posting in the social media realm, be sure that you have permission to share student information in this way.
Feedback
The feedback that you receive on your finished product will be different than feedback during the revising, editing, and polishing stages. First of all, it may come to you through different channels. While peer editors are probably people who you already know, viewers commenting on a YouTube video will likely be complete strangers. At times, you will have the ability to turn the comment feature on or off. You will need to determine the best choice for you and this particular project. Also, because your work on this project is finished, the feedback that you receive now will inform your next project, not this one; nevertheless, this is still exceptionally valuable and can help you grow in your craft.
Take note of what people like. If several people call positive attention to the same things, it’s likely something that you’ve done very well. Take pride in this success and remember what made your project effective, as this will be something to replicate in future work.
On the other hand, if you receive criticism or negative comments, it’s hard not to take it personally, but remember that you will almost never impress everyone. Consider the source of the comment. Sometimes, it’s easy to discern if the comment has merit, and other times, it’s less clear. Rather than putting too much weight on any one comment, consider comments that are repeated. The more often you get the same message, the more likely it’s something that you should take seriously.
When you do get suggestions for improvement, give them solid consideration. While you might not go back and change this particular project, it might inform ways that you can improve your next one. As with any art form, writing takes practice as well as repeated trial and error. If you can embrace a growth mindset, you can use the feedback you receive to empower your next attempt.
Reflection
Self-reflection should not be a one-and-done event. It should happen all the way through the writing process, and it should happen again now that the project is finished. As alluded to in the feedback stage, you will want to reflect on the input and reactions from your audience. Then, reflect on what that feedback means to you and your future work.
You should also reflect on the process itself. What worked for you? Was there a certain strategy or digital tool that really helped propel you in the writing process? Was there one that you struggled with or that failed for you completely? These reflections can all inform your work going forward. Indeed, this is how we grow.
Multiple AVID Open Access articles provide deep insight into the reflection process as well as suggestions for digital tools and strategies. While these articles focus on topics ranging from progress monitoring to project-based learning to inquiry and self-reflection, they can all be applied to this stage of the writing process. Reflection encourages the use of metacognition, and it can be very empowering for students to think about their thinking.
- Establish a Feedback and Progress Monitoring System (article)
- Review, Reflect, and Revise: Step 6 of the Searching for ANSWERS Inquiry Process (article)
- Support Student Reflection, Critique, and Revision in Project-Based Learning (article)
- Structure Student Reflection Activities Effectively for Remote Learning (article)
- Support Student Reflection With Live Virtual Strategies and Tools (article)
- Support Student Reflection With Self-Paced Virtual Strategies and Tools (article)
- Collect, Reflect, and Recollect: The Power of eBinders and ePortfolios (podcast episode)
In every stage of the writing process, you can leverage technology to help you power up and improve your writing. There is no need to use every tool at your disposal, but it is very helpful to find the ones that work best for you. Writing is a personal and complicated activity. What works for one writer may not work for another. Fortunately, there are many digital options available from which to choose. Try a few out on your next writing project and experience the potentially transformative power of technology.
Extend Your Learning
- 15 Digital Tools for Student Reflection on Learning (Karen Cornelius)
- 10 Ways to Publish Student Writing (Amanda Write Now)
- 50+ Ideas for Publishing Student Writing (Teacher Off Duty)
- Writing, Journaling, and Blogging Websites for Students (Common Sense Education)
- Font (American Psychological Association)
- Edit or Remove Captions (YouTube Help)