In previous articles, we’ve explored five main types of media that students can use to create digitally: video, audio, images, writing, and animation. While we reviewed these formats individually, they are seldom used in isolation. Yes, students may start by focusing on one of these formats at the beginning of a project, but they almost always find themselves expanding their initial focus into a multimedia project―a project that combines two or more types of media into one final product.

This “mash-up” of different formats and tools is a natural evolution in the digital creation process. Digital tools are increasingly designed to be integrated with each other, and largely because of this, we seldom see these formats used in isolation. Writing often includes pictures and illustrations. Images often include text. Websites integrate text, video, audio, and images. Even our emails and text messages commonly include animated GIFs, links, images, and emojis. Multimedia creations are all around us, and they can be powerful ways to communicate.
When we think of digital creation in terms of multimedia rather than a single format, we significantly broaden the creative options available to our students. This shift to multimedia results in a similar, positive shift in the creative process. These shifts also encourage students to think outside of the box and find new ways to combine different types of media.
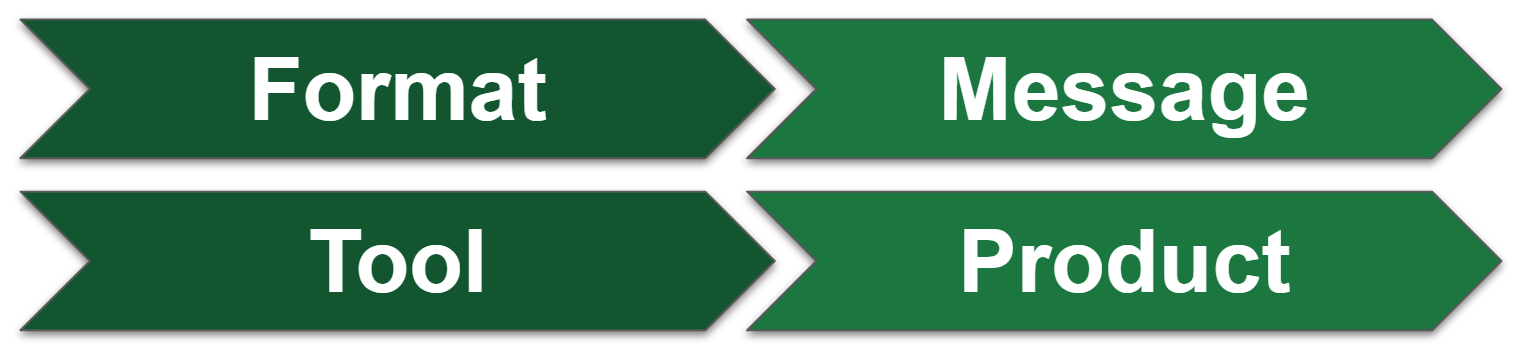
When students use multimedia, their priorities evolve from a focus on a specific format to a more important focus on the message, and similarly, they shift their attention from the tool they are using to their outcome or product. This directs their focus on the parts of the process that are most important.
This is not to say that creativity and invention do not happen when students are expected to use a single tool. Students grow from any opportunity to create. However, when students have access to multiple formats of media, their virtual playground grows in size, and their creative options multiply exponentially.
6 Key Decisions in Designing a Multimedia Project
In previous articles in this series, we explored ways to integrate specific media formats into the classroom, and we provided lists of digital tools that might meet these needs. Throughout these articles, there have already been frequent references to multimedia production. This makes sense since it’s so common to combine tools and formats.
In this article, however, we will focus specifically on merging formats to create multimedia. We will highlight some of the key decisions you should make when designing a multimedia project and share some examples to get you started. To get even more ideas about multimedia integration, tools, and lesson ideas, we encourage you to look back at our previous articles. No matter how you decide to integrate multimedia projects into your classroom, however, be sure to consider these 6 guiding questions.
We should be intentional about everything we do in our classrooms, including multimedia projects, and part of this intentionality means aligning the projects with meaningful learning targets or objectives. This will almost always include academic standards, but we may target other outcomes, as well. For instance, we might intend to build our classroom community or develop skills in the 4 Cs (creativity, collaboration, communication, and critical thinking). Whatever the activity, however, we must make sure that we are intentional about its purpose and that it aligns to our classroom goals.
Before implementing any project with your students, be sure to get specific and define the project criteria. This is the logical next step once you’ve aligned the project to your outcomes. You should have a clear vision of what you expect, and your students need clear expectations and purpose, as well. If students don’t know what they are supposed to do (or why they are doing it), they will probably not produce quality work. After all, it’s hard to hit a target if you don’t know where to aim.
One effective strategy when designing a project is to backwards design it. Essentially, start with the end in mind. Ask yourself what a quality finished product looks like and how it should align to your desired outcomes. Once you have a clear vision in mind, create a project checklist or rubric and share this with your students. There should be no surprises, and students should know how they will be assessed on their submissions. Ideally, students will use the assessment criteria to check their progress throughout the creation process.
As you develop your criteria, consider including these items in your checklist or rubric.
- Learning targets to be demonstrated
- Curricular content to be included
- Types of media required or allowed
- Quality indicators or specific project criteria that you’ll be evaluating
- Scope of the project
- A project timeline (with checkpoints and due dates)
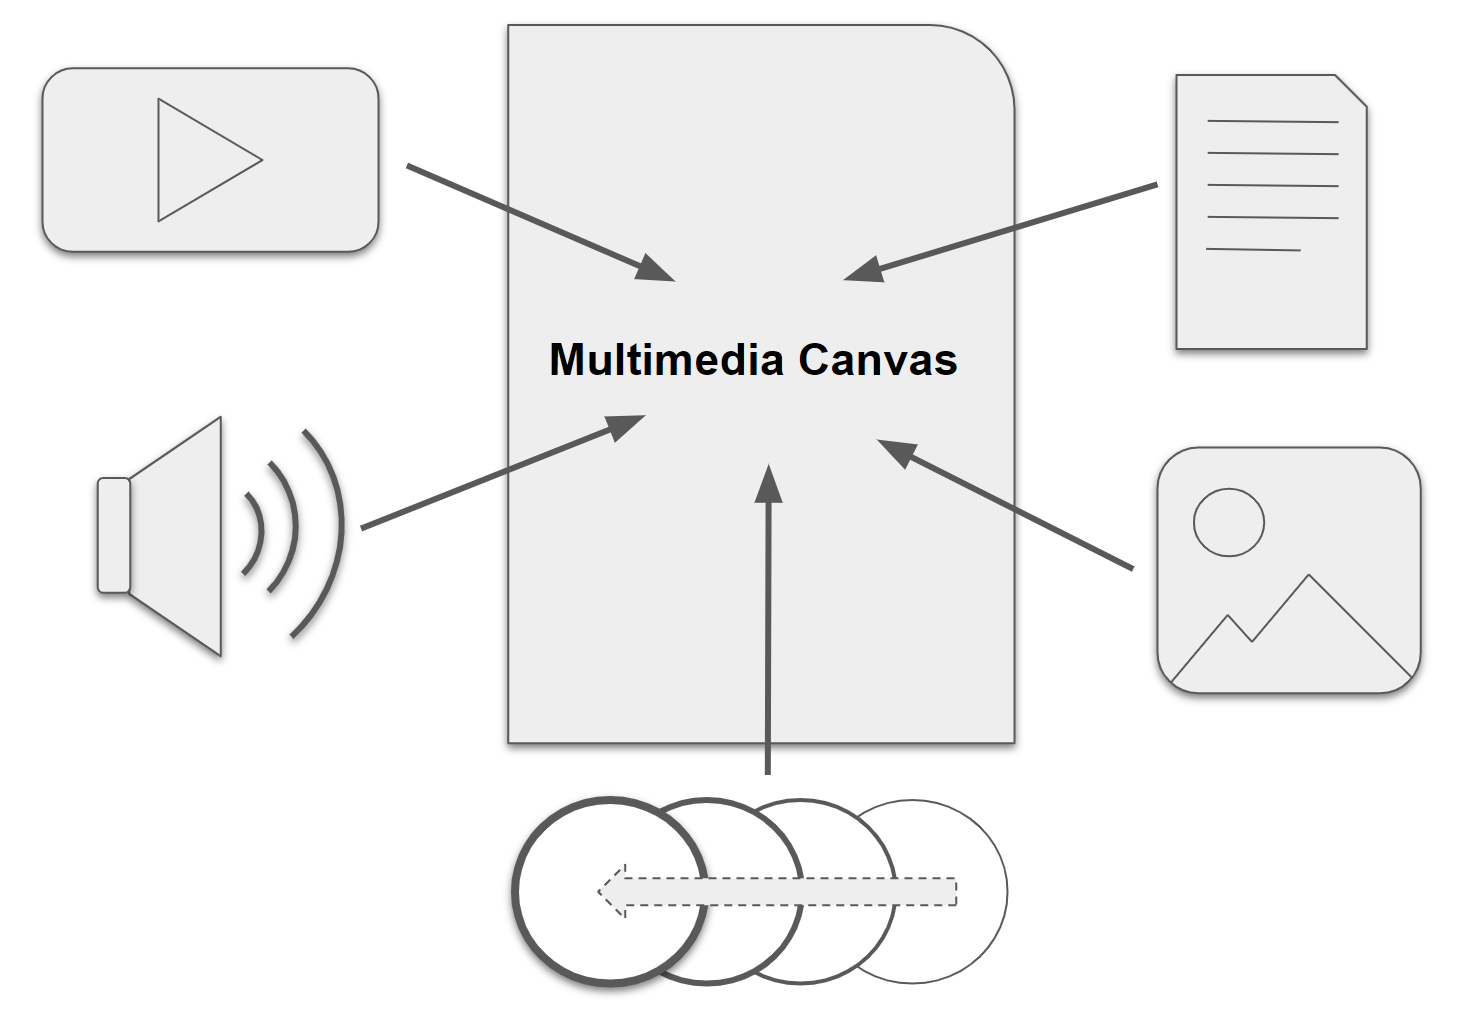
With most multimedia projects, there is still one primary format type that serves as the foundation and focus for the project. This usually defines the overall final product type and provides students with a digital canvas upon which they can embed other types of media. You can give students a choice on this if you wish, or you can require everyone to create using the same type of digital canvas. Setting the overall canvas type will still provide students with ample opportunities to create and integrate other media formats, and it can help you better define the project for your students. Whatever you choose to be your digital canvas, the key is that it allows for other media types to be integrated into it. In fact, we refer to it as your “canvas” because, like a painter, it’s the blank starting point upon which you can apply all the colors (and media types) you imagine.
The following list is not comprehensive, but the media types provided are great options for primary multimedia canvases. Each of these options generally allows for the integration of all five media types we’ve explored in this collection of articles: video, audio, images, writing, and animation.
- Slideshows: At first, this might appear to be overly simplistic, but slideshows are incredibly versatile places to start. Yes, students can create traditional presentations, but they can also create many other products, including infographics, digital posters, interactive kiosks, comic strips, digital books, stop-motion animation, and so much more.
- Infographics: We mentioned infographics in the list of products that students can create with slideshows, but if students know they want to create an infographic or digital poster as their final product, they might want to use tools dedicated specifically for this purpose. These tools usually provide templates and multimedia options that are easy to access and use. Students can also choose to start from scratch with a blank canvas.
- Digital Books: Students often love to see their work published in book form. It legitimizes the work and makes it feel more polished. Of course, it’s still important that students put in the necessary effort to make it creative and meaningful, but if they are driven by the desire to achieve the final product, they will often be more intrinsically motivated. Countless creation options fall under the umbrella of digital books―like stories, comics, documentaries, biographies, lab notebooks, and more―giving students many choices with this canvas type.
- Websites: This might be the most powerful canvas of them all. After all, websites have become the hub of nearly all information available to us. Frequently, companies and agencies don’t even publish in print anymore. Everything is online. On one hand, this is a cost-saving measure, but on the other hand, the digital canvas provides so many more opportunities to create and communicate. This medium also allows content to remain more current since updates can happen quickly and in real time. Because multimedia websites are digital, these options are accessible and generally available for free to our students.
- Blogs: While a blog is really a subtype of a website, it’s worth calling out separately since it has become such a popular type of digital canvas. Like a website, it’s easy to add multimedia to a blog, and while the design options might be a bit more limited due to the serial nature of blog posts, blogs still offer extensive creative design and content options. This is a great choice if you want viewers to respond to the posted content.
This is a reminder that you should give students an opportunity to make creative choices when completing their multimedia projects. You won’t want to make it so prescriptive that students are just jumping through hoops and following steps that lead to 30 products that all look the same. It’s important to have parameters, but it’s also important to allow students room to move and create within those limits. In general, your parameters should give students direction and guidelines that ensure the final product meets the instructional objectives you’ve established. Beyond that, you can often provide more flexibility and choice.
Not every creative project must be collaborative, but not every project should be completed individually either. Students need frequent opportunities to work with their peers to develop interpersonal and collaborative skills. When students create with others, they are required to use all 4 Cs: collaboration, creativity, communication, and critical thinking. In many ways, creative projects that are collaborative end up being the perfect classroom formula for working all these skills into one learning experience. In addition to development of the 4 Cs, working together can also be a great catalyst to the creative process, and it gives them valuable opportunities to develop socially and emotionally.
It’s important that students know the answer to this question before they start planning and creating. Both the target audience and mode of sharing should be included on the initial rubric or checklist that you share with your students when introducing the project. Knowing these details will allow students to design their project intentionally, with the intended audience in mind. A message to a parent/guardian will probably be much different than a message to a classmate. Also, you won’t want students to be caught off guard by who will be seeing their final product. They might be comfortable sharing content with their classmates, for example, that they would not want to share on a more public website.
The other aspect to consider with this question is the authenticity of the audience. The more authentic the audience, the more authentic the motivation for creating it. If it’s only going to be seen by the teacher for a grade, students often don’t invest as much effort. However, if it’s going to be viewed by a larger and diverse audience, they will be likely be more motivated to create something that gives them a sense of pride. In this case, it becomes more about the reaction to the product than the grade they will receive.