Our students have grown up in a time when videos have seemingly always been a click away and easy to create. Phones can be used to stream movies, browse YouTube, and post TikTok videos. Video has become a natural form of expression for many students, and in many ways, their phones are now more powerful video cameras and production suites than previously available in entire school news studios.
This Brandwatch article provides eye-catching statistics about YouTube usage, and to put it mildly, video is a very popular media format, especially with the younger generations. As educators, we can make learning more relevant to our students by tapping into the popularity and ubiquity of video and integrating it into our lessons. However, it is not enough to simply “show” videos. The passive consumption of content has its place, but where the power of video really lies is in the act of creation.
To leverage the full benefits of video, we need to let our students be designers, creators, and producers, and there are many ways that we can make this happen in our classrooms. Additionally, by allowing students to be creators, we also demystify how videos are created, which can empower our students to be more discerning consumers of video content.
In each section of this article, we’ll explore both tools and integration strategies. When reviewing the tool options, consider the following checklist:
- Compatibility: Does the program work on your available device?
- Cost: Do you have a budget, or are you looking for a free option?
- Features: Does your selection include the features that you will need?
- Ease of Use: Is the program age-appropriate and user-friendly enough for your students?
While choosing a tool is important, even more critical is designing a meaningful strategy for integrating video into the learning process. Therefore, in each section, we’ll offer integration ideas and resources to get your students designing, creating, and producing. Although we’re categorizing these strategies into categories, don’t feel restricted by where we’ve placed it. Most of the applications can be easily transferred to another category of video use. Use this list as a starting point but not the only way to apply a video integration strategy.
Screen Recording
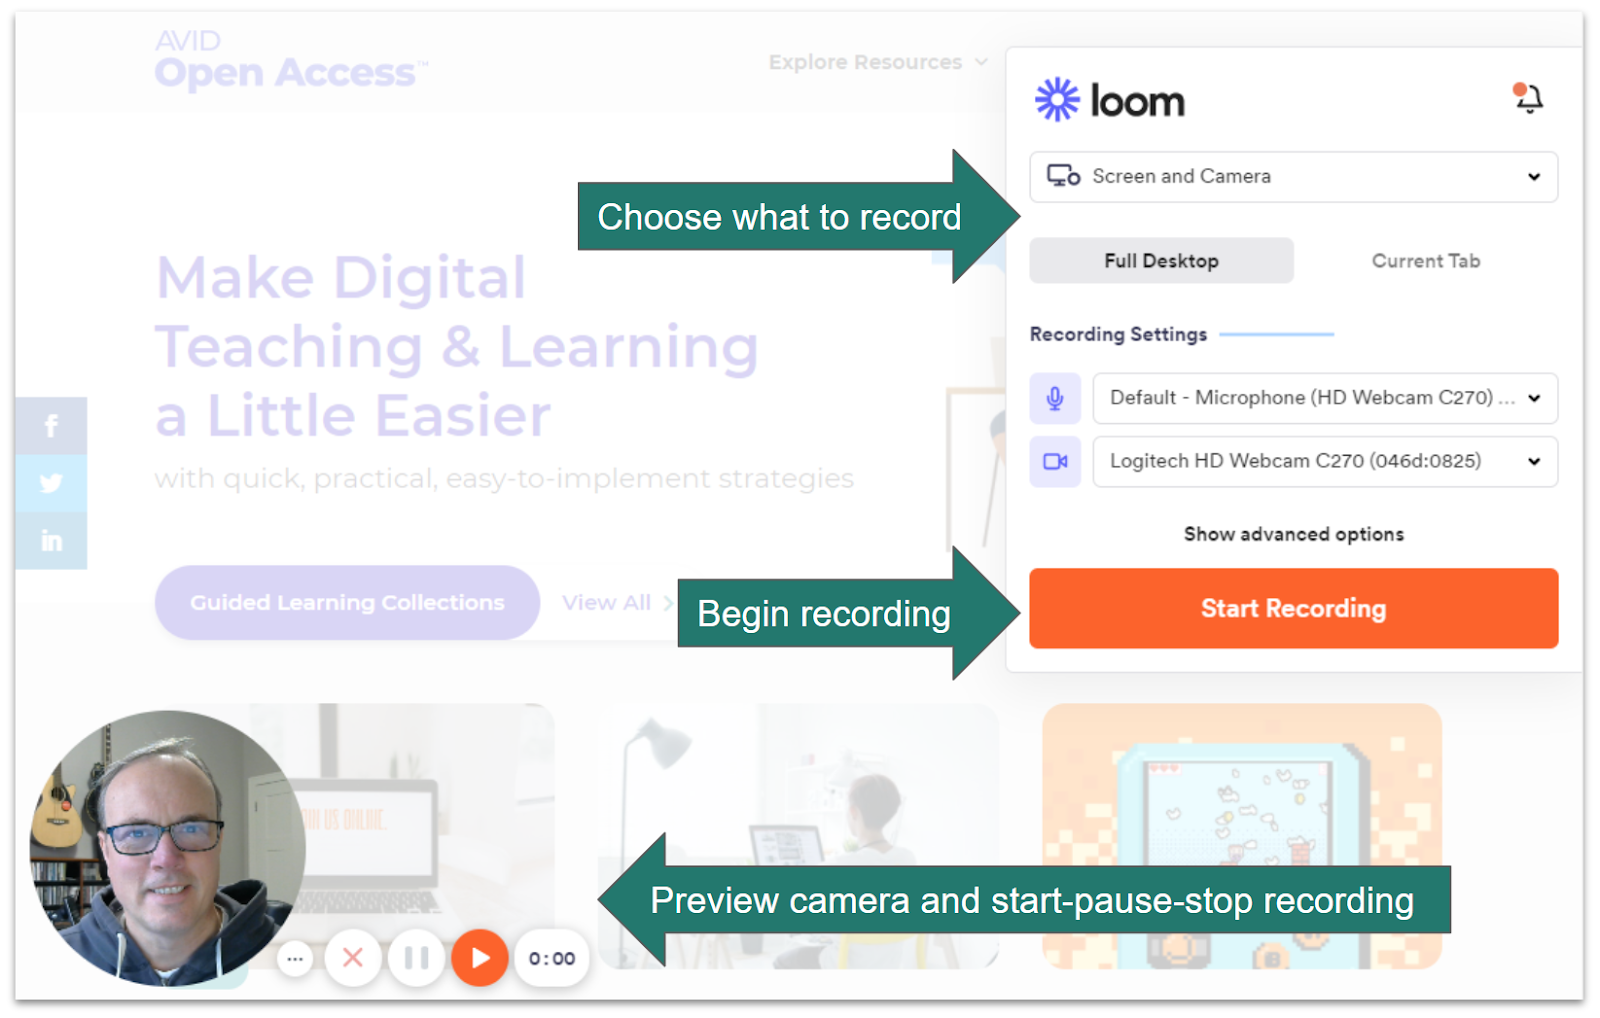
Screen recording (often called screen casting) is the process of capturing whatever you see on your computer screen while simultaneously recording your voice. Many screen recording tools allow you to choose what you wish to record: your screen, your webcam, or both. By choosing “both,” you can insert an image of yourself in the corner of the screen cast recording, which can make a recording more personal by allowing the viewer to actually see you speaking.
The image below illustrates a typical screen casting workflow. First, you would open the computer program or screen that you wish to record. In this example, it’s the AVID Open Access website. Then, after launching the screen recording software, you would select what you wish to record (screen, webcam, or both), and then start recording. You can usually manage the recording process with on-screen controls. In this example, both screen and webcam are recording, so you can preview the webcam at the bottom left of your screen.
While screen casting is a popular and useful strategy for teachers who wish to create an instructional video for a flipped classroom or a distance-learning lesson, it can be even more powerful in the hands of your students. If you are wondering how you might use screen casting in your classroom, consider some of the integration ideas below.
Integration Ideas for Screen Recording
- Teach Backs: Have students use a screen recorder to explain a concept that they have learned. Essentially, they are “teaching back” the lesson content. As teachers, we know the power of teaching. We often don’t really understand a concept or topic completely until we have to teach it, and this process lets our students be the teachers. This strategy integrates well into a jigsaw activity, or you can use it for both formative and summative assessments. It can also be a virtual alternative to student presentations.
- Whiteboard Animations: In some ways, this is like the teach back strategy. However, rather than narrating content that has been previously created, students explain themselves in real time as they record themselves annotating on a digital whiteboard. This allows them to sketch out the concepts as they are explaining, much like they would do at a classroom whiteboard or while sketchnoting. This is a popular strategy with math teachers who want to see and hear their students working out a problem.
- Documentation of Learning: In this application, students use screen casting software to periodically record their progress. This works really well for performance skills, like public speaking, playing an instrument, or doing a push-up. It also applies really well to science experiments, where students can document their work and analyze the results.
- Storytelling: There is power in telling stories. It can make abstract concepts come alive and make them more understandable. It’s also a way for students to apply the content they are learning to the life they have lived; this makes the learning relevant and real. Screen casting tools can give students a platform for telling, capturing, and sharing these stories. One powerful method is to have students first create a slideshow, and then screencast themselves talking through it.
- Peer and Self-Evaluations: Video is a great format for capturing feedback. Sometimes, this is through self-reflection, and sometimes this is to offer insights to a peer. For instance, after a student has created some form of a digital product, they can present it on their screen and walk the listener through it—explaining which parts they feel turned out really well and which parts they still wonder about improving. Similarly, students can offer feedback to peers using this same strategy. This works great for providing feedback on writing and presentations since the reviewer can show the project on their screen and record their annotations as they provide feedback. The visuals help to avoid misunderstandings and add clarity to the narration.
- Classroom Newsletters: Parent newsletters do not have to be created by the teacher nor do they need to be something that is printed and sent home in a Friday folder. In fact, allowing students to create these newsletters through video screen casts can make this communication come alive for families, and families will love seeing and hearing their family member take a turn as the voice of your class newsletter. It’s still helpful for you to give some structure by providing some parameters and a process, but then empower students to do most of the work. Let them help generate the script, create a slideshow to guide the talking points, and take turns recording the weekly message in their own voices.
Screen Recording Tools
Screen recording tools are available for virtually any platform or device. In many cases, there are several excellent options from which to choose, and it often comes down to personal preference or specific features that you are seeking. Be sure to consider your learning objectives first, and then find the best tool to help you accomplish that goal. Of course, if your district recommends a specific tool or has purchased one for your use, that will be your best option.
If you don’t have access to a paid screen recording tool, you can probably find a free one to meet your needs. In many cases, these products offer limited free features to get you started and then require a purchase or subscription to access the premium features. Because of this blend of free and premium features, these are often referred to as “freemium” products. Most tools offer the option to trim the beginning or end of the video, and many allow you to edit out parts in the middle. Some allow you to highlight your cursor or annotate the screen during a recording.
Use the following list to introduce yourself to some of the most popular screen recording tools available. You may want to try out several of them, and then determine which is the best fit for you and your students.
Record videos through the Loom website or convenient Google Chrome extension, which makes it ideal for any device, including Chromebooks. Finished videos are stored for free in the Loom site, but they can also be downloaded if you prefer to share them through YouTube or a shared drive. Loom offers its premium version free to students and teachers through a simple verification process. Videos can be up to 45 minutes long.
The Google Chrome extension makes this another great choice for Chromebooks. The free version allows for editing and exports to YouTube or Google Drive. Recordings are limited to 5 minutes with the free version.
Screencast-O-Matic can be launched from the website or through their Google Chrome extension. With the free version, you can record up to 15 minutes, trim the beginning and end, and publish to YouTube or Google Drive.
Vimeo can be accessed via their website or Google Chrome extension. Vimeo offers unlimited recordings and time limits as well as the option to record screen, webcam, or both. Videos can be downloaded, embedded, or shared with a link.
Since QuickTime is included on Apple computers, this is an ideal option for screen recording on those devices.
To activate this tool, click the Windows key and the letter G at the same time on your PC. While created to record Xbox video game play, it works well to record your screen with audio.
This option is available on iPads or iPhones with iOS 11 or later. This recorder can be accessed by swiping down from the right corner of the screen or by going to Settings > Control Center > More Controls.
This iPad app is a variation on traditional screen recorders, in that you can only record the whiteboard area within the program. However, it does allow you to insert images and record your pen strokes as you write, draw, or work math problems, and it can be a great way to create tutorials. Once finished, you can share the recording with a link, embed code, or Google Classroom.
This is another whiteboard recording tool, but it works on any device. You can create up to three projects with the free version. Create a project from scratch or use a template. You can also collaborate on a project using a shared board with voice chat.
If you plan to share your recordings through Seesaw, you may want to use the integrated screen recording tool to create them. This internal recorder allows you to record yourself with the webcam, or you can record the drawing canvas, including pen strokes. Recordings are limited to 5 minutes.
Video Production
If you wish to move beyond lightly edited, one-take recordings, you will probably want a more full-featured video production tool. These tools allow for deeper editing and numerous creative options, such as transitions, audio tracks, video effects, layered tracks, green screen effects, multiple export formats, and more sophisticated editing options. Because these products include additional features and more robust options, they also require more time to master. Still, while the learning curve is steeper, the payoff is often worth it since these tools offer almost unlimited creative opportunities for you and your students.

Integration Ideas for Video Production
Once you enter the world of video production, you unlock nearly unlimited creative options. These opportunities are usually limited more by your classroom situation than the software itself. For instance, you’ll need to consider how much time you can allocate to a video project. It will take more time for your students to learn the ins and outs of the software before they are able to produce a finished product, and as the projects become more complex, they will also take longer to write, record, edit, and publish. However, if you choose to have students work on multiple video projects, they will become more efficient with each opportunity, thereby reducing the amount of time that you will need to routinely dedicate to the project.
Even when a project requires a considerable investment of time, it still may be worth it. There are many benefits of digging deeper into a project, including the opportunity to develop transferable life skills, like communication, collaboration, critical thinking, and problem-solving. Bigger projects also give students the opportunity to develop perseverance while exploring course content on a much deeper level than they normally would.
The following list of integration ideas are just idea starters for you. In your classroom, you are the expert and will want to design projects that meet your learning outcomes. However, this list may give you a foundation upon which to build, combine, refine, and reinvent your own video production ideas.
- Newscasts: This is a great way to involve an entire class on one project, and it can be adapted to nearly any topic or content area. Have your students determine their audience and purpose, and then collaboratively brainstorm the lineup of features and news stories for the broadcast. Divide students into teams (perhaps one story per team), and then have teams divide up the responsibilities. Once each group has created their story, have them combine them into one finished video production.
- Narrated Slideshow: This final product may be similar to a screen cast, but the process is different. For this activity, have students first write a script that addresses your academic prompt or leading question. Then, have students use the audio feature in the video production software to record themselves reading the script. Once the audio is in place, have them insert images, text, and transitions to visually represent each of the ideas that they are explaining.
- Documentaries: Documentaries are a great catalyst for student inquiry and research. Given a topic, the students need to find the most informative and insightful content they can to include in their script. This gives students an authentic reason to research and seek out answers. It’s also a great opportunity to integrate primary sources, like photographs, letters, field trips, or personal interviews. Personal interviews can be especially powerful because they add in a human element and make the topic more personal. Email and videoconferencing tools open up new opportunities to connect with experts beyond the classroom and can enrich the experience.
- How-To Videos: YouTube is filled with how-to videos, so your students are probably already quite familiar with them. How-to videos can be a great video activity for procedural or task-oriented topics. Once again, it allows students to become the teachers of the content rather than just the consumers. The project is both a learning activity as well as a way for you to assess your students’ learning.
- Dramatizations: These videos can range widely in scope. They can be role-plays that are quickly captured in one take, or students can develop them into larger productions that become full-featured mini-movies with complex storylines. English language arts teachers might have students reenact a scene from a story or play, or they might ask students to rewrite a scene to be set in a different time period or setting. Younger students might act out a fairy tale. History teachers could have their students conduct interviews with historical figures or reenact a historical event, such as the First Continental Congress. Science teachers might have students dramatize science concepts, like cell division, with each student being a part of the cell and talking about their function in the process. It’s also a good idea to involve students when creating the project parameters. They often have great ideas, and the additional ownership can be motivating.
- Digital Storytelling: In its simplest form, digital storytelling is the use of multimedia tools to tell a story. Because the definition can be quite broad, the opportunities and options are likewise broad, and there is definitely overlap with dramatizations. To create a digital storytelling assignment, consider your content area and determine what “story” your students can tell. Is it a story of their learning in your class? Is it the story of a science experiment? Is it a documentation of their artistic creation process? Is it their own personal story of how the academic content connects with them and their lives? The options are nearly limitless.
- Extended Productions: This type of project includes things like time capsules, video portfolios, and class yearbooks. These take a longer time to write, film, and produce. In fact, they may even extend over the course of an entire school year. In some cases, they might even extend throughout a student’s experience in a school building. For instance, they might create their own middle school learning journal. With any of these extended projects, it is important to do regular, formal check-ins on their progress. It’s also a good idea to embed learning activities through the process to keep it connected to current learning. These might even culminate with a public showing, giving the students a more authentic audience (and additional motivation) for their work.
- Stop-Motion Animations: String together a series of still images to give the illusion of moving objects. This animation technique is ideal for illustrating scientific concepts, like cell division. It can also be used effectively for storytelling. Move your characters little by little in each consecutive frame to have them move across the screen. Even the youngest learners have fun using LEGO people or paper characters to animate their story. In history class, you could create animated military maps or the addition of states during westward expansion.
- Green Screen Magic: Using green screen (chroma key) effects, you can record yourself in front of a green screen, and then insert any video or image as your background during the production phase. This can be a great way to inspire your students’ creativity and allow them to interact virtually with almost any content. For instance, they could be a tour guide to another country, a famous museum, or even the inside of the human body.
Video Production Tools
While you may find a tool or two that you can access free of charge, most of these production suites are “freemium” products. Therefore, you will need to determine if the free versions will meet your needs or if you need to explore a paid option.
While there are other products on the market, our list will explore options that include some degree of free access. As with any free service, you’ll need to study the available features as well as limitations on maximum length for each video, storage limits, export formats, and available features.
WeVideo is a powerful online video editing solution, and it is one of the most popular options for students using Chromebooks. With the free plan, you can export up to 5 minutes of video per month. Free videos include a WeVideo watermark when exported.
iMovie is the full featured video editing program from Apple. There are versions for both Mac and mobile iOS devices. If you have an Apple device, this is likely your best option since it is both powerful and free to Apple users.
The free editor is quite robust, as it allows editing of video, image, and audio files, with the ability to add subtitles, filters, and visual effects, like slow motion. With the free version, you can record webcam videos up to 5 minutes in length and export videos up to 480p (standard definition).
The free Kapwing editor allows access to all Kapwing tools and projects up to 7 minutes long. Content stores on the site for 2 days, so this is best for quick projects. Final videos are public and can be downloaded. Kapwing offers a wide gallery of video tools beyond their editing studio (meme generator, subtitler, video resizer, etc.).
YouTube Studio is free and offers a few limited editing options for videos that you have uploaded to YouTube. This is not a full-featured editor, but you might choose this option if you simply wish to crop the beginning or end of your video or if you want to remove parts in the middle. You can also add a few simple effects, like blur and an audio track.
iMotion is a time-lapse and stop-motion app for iOS devices. It’s a free download with in-app purchases. There are numerous other apps available for both Android and iOS devices for creating videos with special effects, like stop-motion or green screen production. Search the App Store for ideas.
Multimedia That Includes Video
Sometimes, a project can go beyond video to include other forms of media, like audio, images, text, links, and more. For some multimedia projects, you might decide to require certain elements, and then allow freedom to create and customize beyond those requirements. For instance, you might define the final format (a video, for instance), but then allow for creativity within those broad parameters, or maybe you allow any final format as long as it includes a video. Oftentimes, the format is less important than whether students are actively and deeply engaging in their new learning and have an opportunity to create, communicate, collaborate, and solve problems.
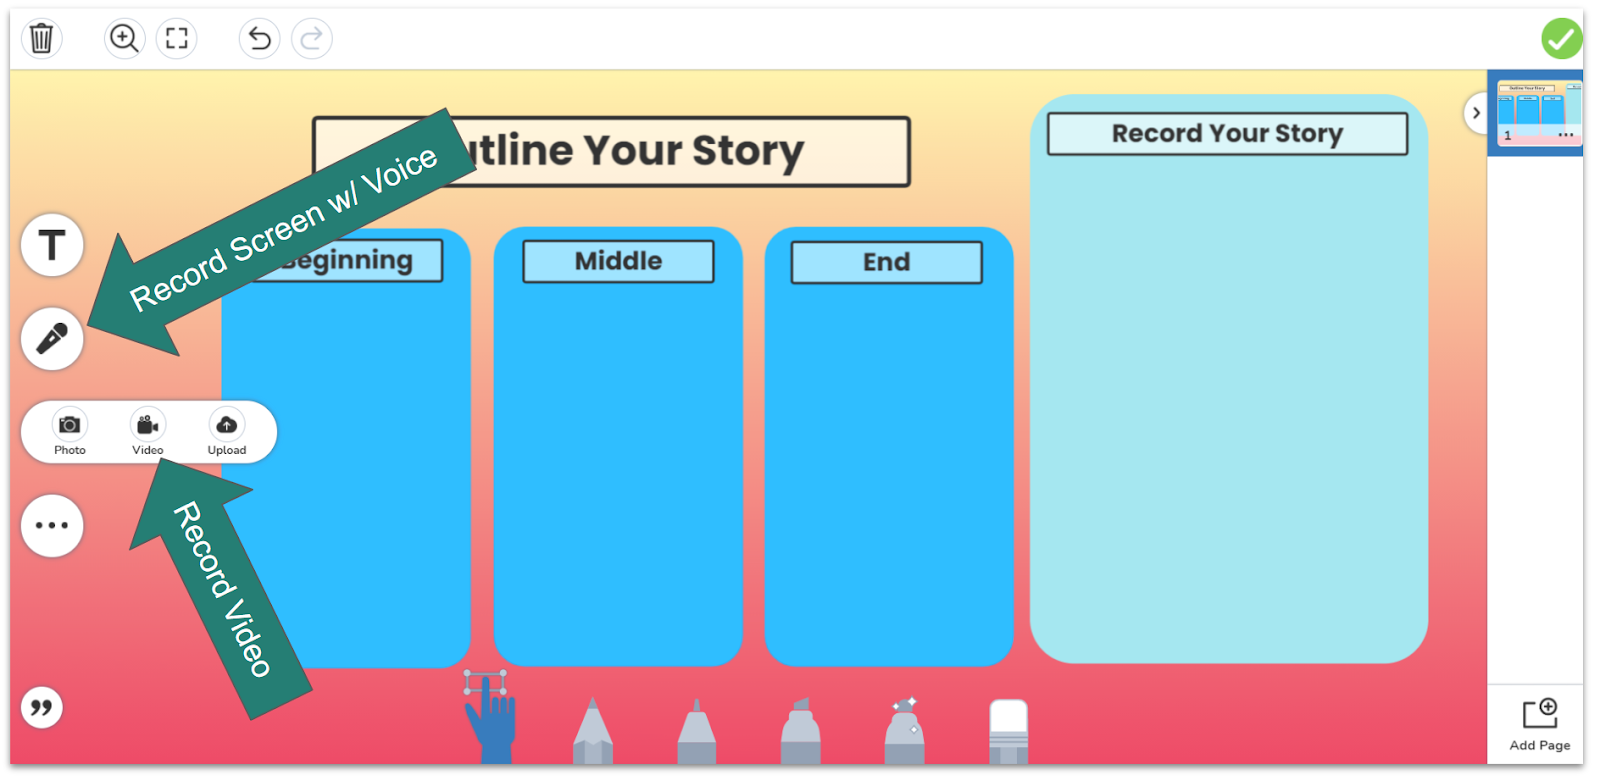
Seesaw is an example of a multimedia creation tool. It allows students to draw, add images and shapes, and insert text, as well as record or upload video and screen cast their work with a voice recording. This mix of media types offers students many creative options for communicating their ideas.
Integration Ideas for Video and Multimedia
Most of the integration ideas for screen casts and video production can also apply to multimedia presentations. As with any classroom activity, the learning outcome should drive the activities and creation goals. The biggest difference with these multimedia creations is that the students have an expanded palette of options when creating. Also, depending on the tool that you choose, the toolkit may be available in one place. This simplicity can help students focus on the learning outcome rather than searching in multiple places for different tools.
Here are a few additional learning activities that apply nicely to multimedia production suites.
- Show and Tell: Students use both visuals and words to communicate. The visuals might include images and video while words may come in the form of printed text or recorded audio. Since most of these tools allow for multiple forms of media on a single page, students can create interactive pages with multiple types of content, including video. Students might even use video to explain the other elements on the page.
- Tell a Story: These tools are ideal for storytelling. This might include the broader definition of digital storytelling introduced earlier, or it might be a more literal definition of a story. Students can write, show, or tell their story using whatever multimedia tools they wish. Again, this can include video combined with other types of media.
- Video Presentation: Some multimedia tools will allow students to export their final product as a video. This allows them to share their diverse media options in a single media platform: video. These presentations can be used for a variety of communication purposes, such as sharing back individual research, teaching back a concept, or connecting course content to a personal experience.
- Reflections: This creative space can be a great opportunity to allow students to reflect on their learning journey in a format that best fits their communication style. Since multiple tools are present in one place, they can mix and match as desired. This process combines self-reflection with an opportunity to express themselves creatively.
Multimedia Creation Tools With Video Recording Options
There are a number of platforms that allow for multimedia creativity and include a built-in video recording tool. While video recording might not be their number one purpose, the inclusion of video can offer increased opportunities for creativity. Even though these video recordings do not offer editing options and must be recorded in one take, they can be powerful because of their overall simplicity and because they are merged with a variety of other creative options that go beyond video.
Seesaw started out as an online learning journal, but it has grown considerably and now features assignable activities. Even the free version offers an interface that allows students to post images, videos, drawings, documents, links, and text. The interface is both simple and powerful.
Buncee allows you or your students to create multimedia slideshows. In addition to the ability to add text, images, and backgrounds, you can record and insert videos up to 3 minutes in length. The simple interface makes this a great multimedia option for learners of all ages.
Create online books with text, links, images, audio, and video. With the free online version, teachers can have one library with up to 40 books in it. The free version of the app offers one free book. Students can set up their own account, too. Finished books can be published digitally, downloaded as an eBook, or printed.
While not a traditional video creation tool, Spark allows you to create a video export from a series of slides. Each slide can include videos, text, photos, icons, and background music. You can also record a voice narration on individual slides, and then when you’re finished, you can export the entire project as a video file.
A Creative Twist on Video Creation: Animations
There are a number of products available that allow you to create cartoonish or artistic video productions without the need to record your own video clips. With these tools, you create a series of scenes (or slides) using templates, sound clips, and props included in the program. You can typically add your own text to the slides but not audio or video. When you are finished designing, you can export the finished project as an animated video. This can be a fun way to share a message in a video format without needing to record your own video footage.
Integration Ideas for Video Animation
Once again, the ideas that work for other video formats can also work here. However, these video creations are oftentimes shorter in length. Because of this, they may lend themselves to a narrower or more focused message.
- GIST Statements: A GIST statement is typically a short summary of 20 words or less. Animated videos can be a creative way for students to form and communicate these summaries. The cartoonish aspects of these tools can help make the concepts more visually memorable.
- Elevator Speeches: Similar to GIST statements, these are short summaries of learning. They are sometimes called 60-second summaries, and the name comes from the idea that you should be able to share these ideas during a brief ride on an elevator. Short videos can be a great way to capture these summaries in a creative format.
- 5-Second Summaries: This is a spin-off of the YouTube trend of 5-second movie summaries. Students create a 5-second animation to recap the main concepts of their learning. They force students to reduce new learning to its essence. It can be both fun and challenging.
- Thank-You Notes: Encourage students to strengthen communication and reflection skills by writing thank-you notes to a classmate, teacher, or someone else in their lives. This activity promotes perspective-taking and thoughtful expression. For a creative twist, have students write thank-you notes from one character to another in a story, helping them practice empathy and deepen their understanding of narrative relationships.
- Book Trailers: Like movie trailers, book trailers are short videos introducing a book to an audience. The intention is for students to get others interested in reading the book (while also showing that they understand the book themselves). These trailers can be made with these animation tools or any of the other video tools described in this article.
- Advertisements: Students can create a short animated video to advertise something. They could pretend to be a character in a story trying to sell something of value, or they could role-play a historical figure advertising themselves for a job or a political office. Science students could each take an element from the periodic table and create an ad for why their element should be chosen as the most important. Tech, art, or FACS classes could advertise products that they have personally created in class.
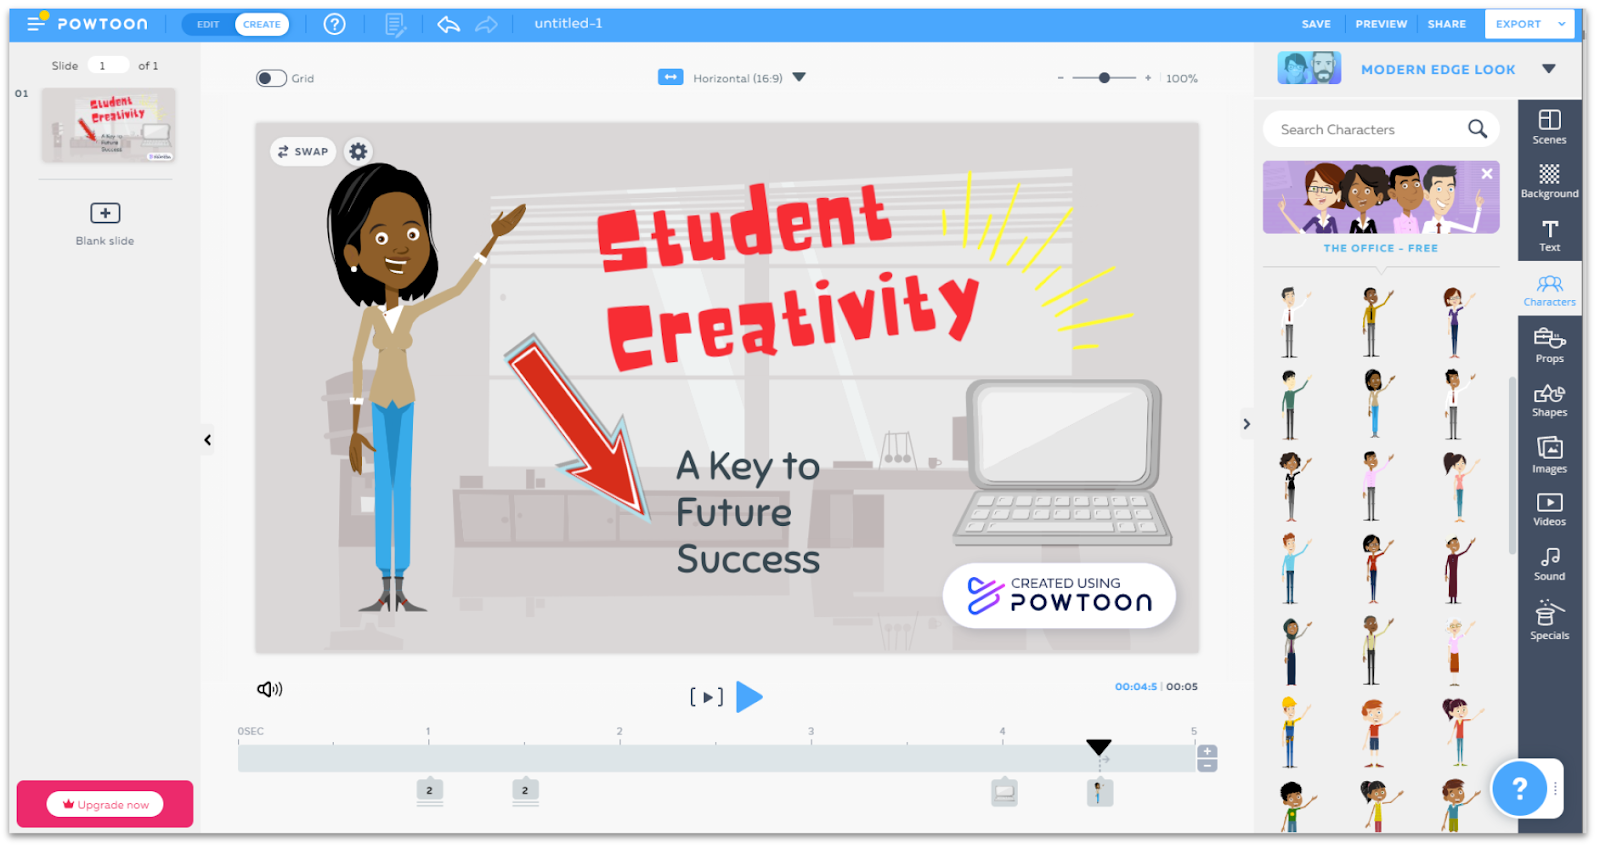
Create cartoon animations that can be exported as a video. The free version allows up to 3 minutes of HD video (and 100 MB of storage). While you can only access the free templates, music, and creative elements, these are likely enough to get you started. Finished products will also include the Powtoon branding. This is a good option for students who might be camera shy or are looking for a safe way to get started creating.
Create explainer videos in a whiteboard animation style. There is a four-step process where you draft, write, visualize, and finalize. Once you have created your script and made your visualization choices, mysimpleshow puts it together, complete with narration. Free videos are published as public videos and are accessed with a link.
Create videos in an animated slideshow format. Add slides, and then drag and drop images, text, music, and other template content into the frame. Adjust the timing for each slide and export as a video. With the free plan, you can create unlimited videos in standard quality (720p) and choose from 50 music tracks, three fonts, and 30 color swatches.
Make It Conversational With Video Dialogue
Video can be powerful when it’s a one-way form of communication. However, its potential can be amplified when it becomes a two-way communication stream, and there are several video tools that can help to make this happen in our classrooms.
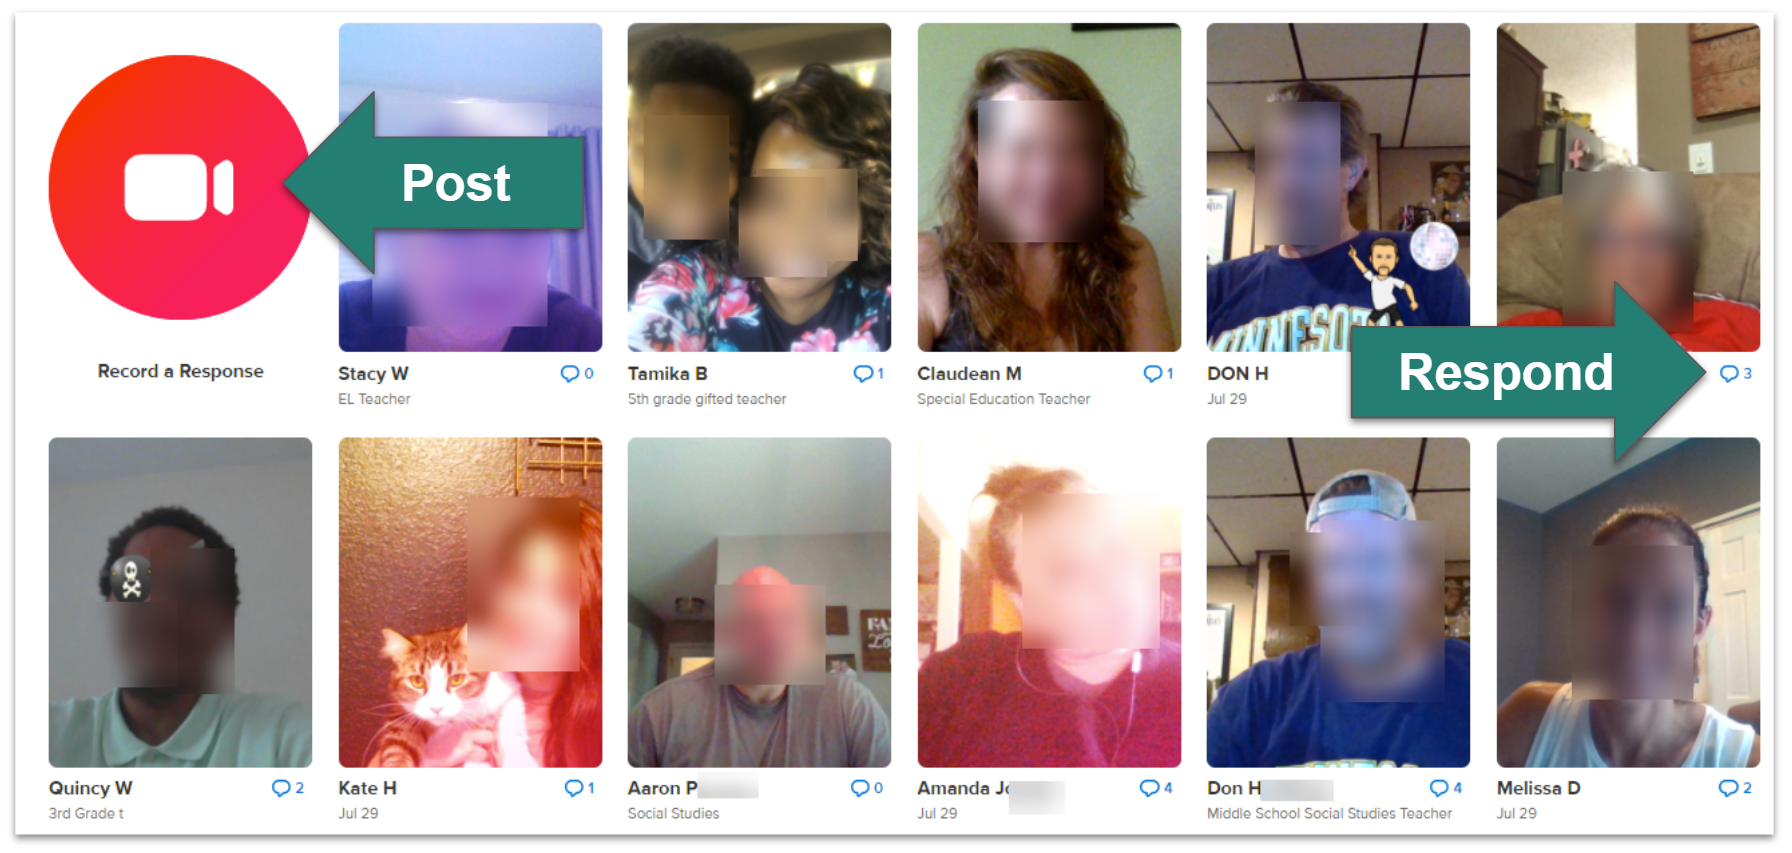
In this spirit, this next set of tools and integration ideas is less about creating products than it is about creating virtual conversations. In most cases, this means video will be used for simple, one-take recordings that involve limited (or no) editing. However, these platforms are designed in a way that allows the video recordings to be connected in a more conversational format.
Typically, students will post an initial recording. After this, they will listen to the video recording of someone else and then respond with their own recording. This format can eliminate barriers for students who are not skilled at written responses or need more time to process their thoughts. It also allows conversations to happen asynchronously over longer periods of time. Because video allows viewers to see facial expressions and hear vocal inflections, students can communicate more nuanced messages through their posts with a reduced chance of misunderstandings.
Integration Ideas for Video Dialogue
The main concept behind these integration ideas is to connect people. This will most often mean connecting students in your classroom with each other. However, you can also broaden the conversation by going beyond the walls of your classroom. Consider connecting with another group of students you teach during a different class period. You could reach out to another teacher or even another school. To stretch your students even more and give them an authentic audience, consider connecting with community organizations, nursing homes, or targeted local citizens. Determine your learning goal, and then consider an audience that would be both feasible and meaningful. These connections can be both powerful and insightful learning opportunities.
- Community Building: Video is a great way for your students to introduce themselves to each other. This community-building strategy works especially well at the beginning of a course or group project. Students post a video introducing themselves, and then they reply to others. In the case of a group project, you can have students respond to others in their groups. It is helpful to give students guidelines for what to include in their recordings as well as how to respond. When students respond to others for the first time, sentence stems can be especially helpful, and they can help share responses that are positive and supportive. You will also want to make sure that all students have responses to their posts.
- Noticing and Wondering: This can be a great processing or introduction activity. Students observe something (like a natural phenomenon) or read something (like the beginning of a story), and then they record what they notice and what they wonder. Peers respond to these ideas. This can be a great discussion starter or an activity to engage students at the beginning of a lesson.
- Two Stars and a Wish: This can be used as a reflection strategy during or after a lesson. Students share two stars (things they liked) and one thing they wish might be different next time. Students can listen to other students’ posts and reply with follow-up thoughts or questions. You could even facilitate some sort of polling question based on these reflections and use the data to share your next lesson. You may use this poster (or a screenshot of it) to give students sentence stems to guide their responses.
- Discussions: In this variation of a traditional discussion post, students submit their thoughts as videos rather than text. This allows students to asynchronously talk to each other. Like with the community-building example, students post both their thoughts and responses to other posts. Typically, the teacher will provide the initial prompt. If you wish students to respond with video, you may also want to model by posting your prompt as a video.
- Philosophical Chairs: This strategy is part debate, part self-evaluation, and the structure can be customized. In general, students learn about a debatable topic and choose a side. Then, they post a video explaining why they took that position. It’s usually helpful to label the post with “for” or “against.” After that, students watch other posts (you determine how many). Students can reply to posts with their own thoughts. At the end of the activity, students would reexamine their position and determine their final stance on the topic. You can even have students keep a running journal where they recommit after each post they watch. While this is set up in a debate-style format, students are encouraged to be open to changing their positions as they learn more about the issue.
- Q & A: In this format, the teacher provides the general topic, and then students pose their own wonderings or questions about it. Then, students read the “I Wonder…” questions from their peers and reply with their own thoughts and answers. This is a great way for students to process something that they have read or viewed for class and allows them to drive the discussion.
- Peer Critiques: Students coach each other and offer performance tips in sports all the time. This strategy brings that practice to academics. Students post a video, and classmates respond with critiques. This practice lends itself really well to classes that “create” products; this might be art, shop, or FACS. It also works well in performance-based classes, like speech and music. It can be adapted to nearly any subject with the proper setup and directions. As with any other peer evaluation, sentence stems can help shape positive and constructive responses.
- Asynchronous Interview Questions: This works really well if you can share this platform with audiences outside of the school. For instance, students could pose history questions to residents at a retirement home. The residents could then respond to the student questions, providing primary sources for class discussion.
- Everybody Has a Story: This activity builds off the idea that everyone is unique and has something that makes them unmistakably themselves. This could be used as another community-building exercise, or it could be a way to study historical or fictional characters. One structure has students posing initial questions, with each student responding to the prompts with their story. Another option is to begin with each person sharing a unique story and others responding with follow-up questions.
- Connect the Dots: In this variation, the video discussion is about finding connections between class content and the world beyond school. Each student can pose a question about something they are learning in class, and other students can respond with applications they see beyond the classroom.
Video Discussion Tools
Flip is a video discussion platform. The teacher creates the initial question or prompt, and then students can respond in a discussion-style format. Students can watch other posts, and then reply with their own video recordings. Flip is a Microsoft product that is free for educators.
VoiceThread is a media player with a highly interactive discussion space built into it. Ideas are presented in a slideshow-style format, and then participants can respond to slides with video, audio, or text comments. When responding with video, you can record screen annotations at the same time. The free account allows you to create up to five VoiceThreads. Students must be 13 years old to set up an account. This works best in the Google Chrome browser.
LMS Discussion Tools
Nearly every learning management system has a discussion tool, and most allow you to post in video format. Sometimes, you can combine text, video, and other media in a single post. Explore your LMS to see what options are available in your school’s platform.
Make Your Video Interactive
This last section is not about creating videos, but rather, it’s about “creating engagement” when watching a video. This is an important concept since the act of watching a video is inherently passive, and these tools offer you a way to confirm that someone did indeed watch your video, while also providing a way to get a glimpse into what they were thinking as they watched it. Typically, teachers will embed interactive questions or comments into the video watching experience. At specified points, the video will stop, and a prompt will appear. Oftentimes, the viewer will need to respond before the video will continue playing.
Integration Ideas for Interactive Videos
- Student Accountability: While this is not really about student creation, teachers find it valuable nonetheless. As the teacher, you can embed your video into one of these tools to provide you with valuable viewing analytics as well as formative quiz question results. This allows you to determine if students actually watched and understood the video content.
- Student Creation: This is where these tools become even more powerful. By having students create quiz questions for their videos, they must think critically about their purpose and what questions will measure the success of their message. Of course, the questions and interactions they add should align to your academic objectives.
- Analysis and Discussion: While most of these tools provide ways to collect data on viewership, Vialogues allows you to set up a live, interactive discussion about a video being viewed. This not only makes the viewing experience collaborative, but it also makes it much more engaging and vibrant. You could set it up for your students to participate in, or you could have students create their own video for discussion.
- Video Critique: You could use Vialogues for video critique rather than straight discussion. Because comments are time-stamped to specific locations in the video, you could have students critique videos and video content through this process. To make this most effective, provide students with criteria upon which they are reviewing the video. Students could even do this to their own videos to create a “director’s narrative,” where they explain their creative choices throughout the video that they have put together.
Video Engagement Tools
Depending on the tool, you will find various ways to embed interactivity into your video. The most common option is to insert questions at key stopping points. The most common question types are multiple-choice, true/false, and essay responses. Some platforms also allow you to insert your own voice notes. This can be helpful if you want to customize a video that you find on YouTube or another hosting platform.
When a viewer gets to a marked point in the video, the video stops, and the question or note appears. Once the viewer answers the question, the video continues. Some platforms even allow you to prevent viewers from skipping ahead without watching the video.
Most of these tools provide convenient dashboards that allow you to track participation in the video experience. They might report data about how viewers answered the embedded questions, the amount of video watched by each person, and the number of times each section has been viewed.
Vialogues is a little different in that it allows viewers to engage in a text-based conversation as they view the video content. With this tool, viewers can stop the video at any point and post time-stamped comments.
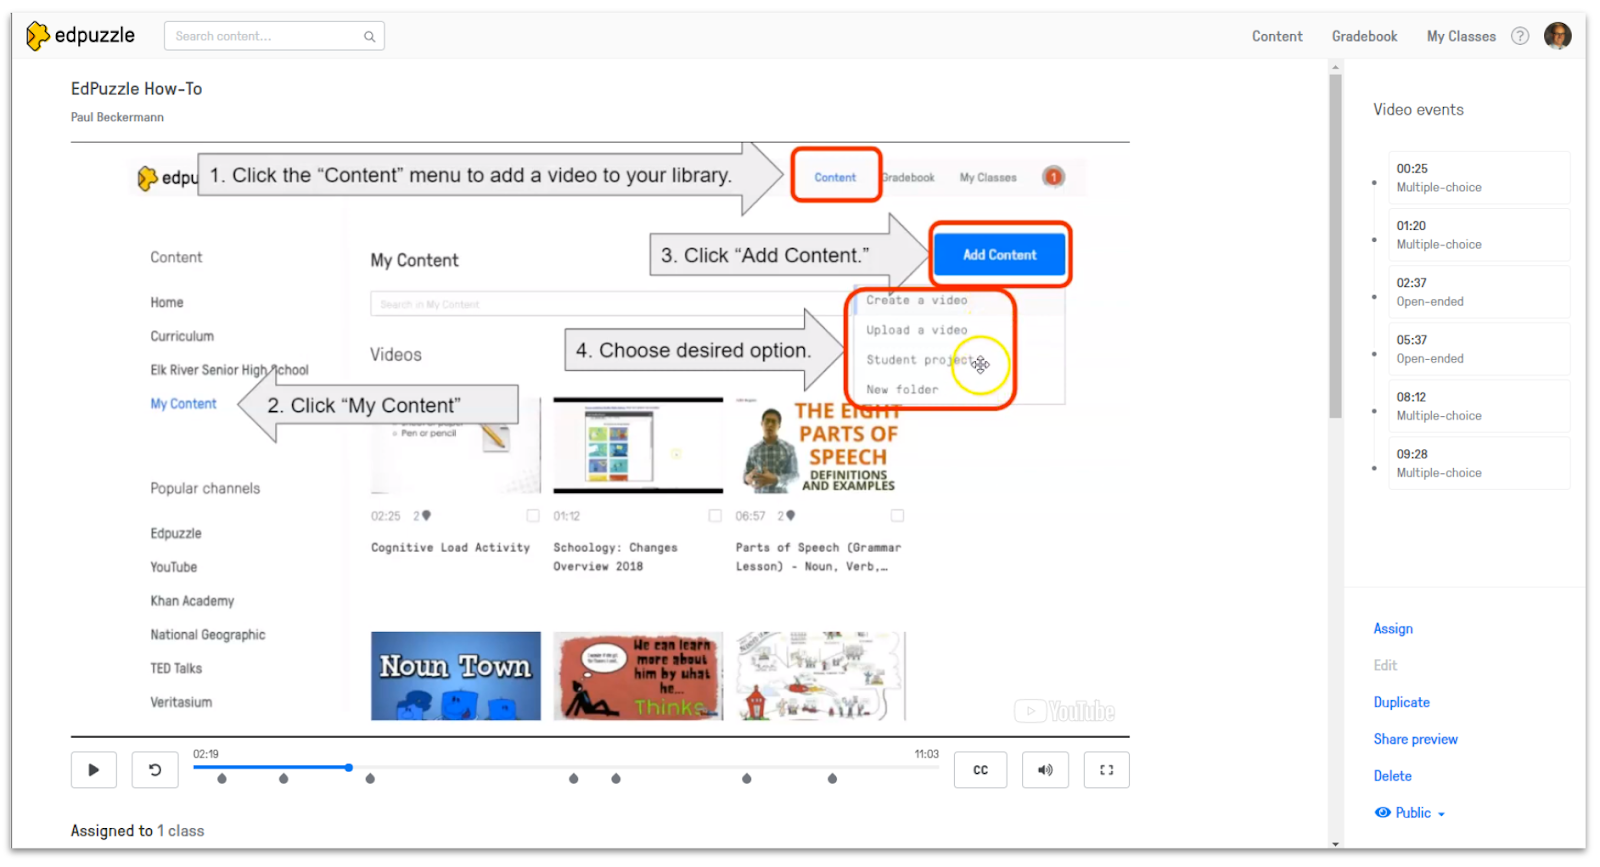
Edpuzzle allows you to upload your own video or use videos from common platforms, such as YouTube, Khan Academy, National Geographic, and TED Talks. You can embed true/false, multiple-choice, and essay questions, as well as voice comments. Choose if you want to restrict viewers from skipping ahead, and then share. Edpuzzle offers a user-friendly analytics dashboard for teachers, and you can create up to 20 Edpuzzle videos with the free account.
PlayPosit is very similar to Edpuzzle. You can add videos (called bulbs) from an upload, YouTube, or Vimeo. Then, you can add “interactions,” such as multiple-choice, free-response, fill-in-the-blank, discussion, or polls. As with Edpuzzle, you can set viewing limitations, like the ability to rewind or skip ahead. Analytics are available through a spreadsheet download, and with the free account, you get 100 total student attempts per month.
Extend Your Learning
- An Educator’s Guide to Storytelling With Video Creation (WeVideo)
- 24 Tips for Creating High Quality Screencasts (Screencastify)
- A Friendly Guide to Video Production (Colorado State University Extension)
- 20 Video Project Ideas to Engage Students (Ditch That Textbook)
- Creative Video Project Ideas for Students (Biteable)
- 57 Ideas for Making Videos in Your School (Blogush)