Many of us have fond memories of watching cartoons or animated movies as a child. Drawings and sketches became reality on the screen and drew us into another place and time. In some ways, it was like watching picture books come to life on the screen, with captivating movement and sound, and it all came to us through the magical world of animation.
Animation refers to the process of making still images appear to move. While this was originally done by drawing and painting a sequence of images, it is now done primarily with digital tools. The motion picture industry regularly uses a digital animation process known as computer-generated imagery (CGI) to create both special effects and full-length animated films. In fact, the industry title accurately defines itself as the “motion picture” industry―or the industry of pictures that move.
Although creating animations was once only achievable by multimillion dollar studios and sophisticated digital programming, today, students of almost any age can create animations at home or in the classroom with a standard computer and an internet connection. Because of this, our students no longer need to be satisfied with passively watching the magic of animation; now, they can become the magicians and actively create it themselves.
Using Animations in Your Classroom
There are a number of reasons why you may want to have students create digital animations in your classroom. First of all, they offer another engaging way to stimulate student creativity and critical thinking―key skills for all students. Animations also offer an excellent medium for digital storytelling, for demonstrating learning, and for communicating both school and classroom news.
1. Digital Storytelling: Digital storytelling is the communication of a message through digital channels, and these messages are often generated with digital creation tools. In general, the act of storytelling is very versatile and can be applied to a variety of purposes, ranging from the telling of a fictional story to the documentation of a factual study. It can even be used to reflect on the learning process itself. Below are a few ways to apply digital storytelling in your classroom. As you review the ideas, consider how you might implement them with your students.
- Retell a story.
- Explain your learning process.
- Describe how you solved a problem.
- Connect a concept to your personal life.
- Summarize a historical event.
- Create a virtual role-play to illustrate a concept.
- Share your dreams or goals.
- Tell your family history.
2. Demonstrate Learning: Assessments can, and should, go beyond tests. In fact, the more authentic you can make the assessment, the more meaningful it will be to the student. As with other creation strategies, students can use animations as a way to share what they have learned.
- Create an animation of a scientific concept.
- Create and animate a model to show understanding in math or science.
- Recreate a scene from a story or from history.
- Animate a map to show an understanding of history or geography.
- Illustrate a mathematical concept.
- Explain the impact of an event on your local community.
- Have a character talk about an event in a story.
3. School and Classroom News: While this is technically a subcategory of digital storytelling, it’s worth thinking about how you can expand the scope of your projects and how you might use them for classroom or school-wide communications. This type of application not only stretches students’ thinking, but it also gives authenticity to the project, which can be very motivational. Here are a few possible applications for this type of digital messaging.
- Promote a classroom product or project.
- Create a classroom newsletter.
- Invite parents/guardians to a class event.
- Feature a student of the week.
- Communicate classroom values and routines.
- Summarize highlights of a class trip.
Finding the Right Tool
Once you’ve determined why you want students to create animations, you will need to choose the best tool to achieve your intended outcomes. While you can allow students to choose their own animation tool, you may need to help guide them early on, especially if the idea of animation is new to them. Fortunately, digital animation tools have become increasingly accessible to our students. Many are available for free, and they range from very simple to quite sophisticated. This broad range provides us with great opportunities to scaffold and differentiate the student experience. The list below outlines six ways to get your students started creating animations. For each idea below, there are also possible tools listed to help get you started.
This can be a great place to start introducing animation to your students, especially younger learners who need a simple process. The general process consists of first finding an image that will serve as your character. Then, students use software to add audio of themselves speaking. These simple computer programs merge the recorded voice with an automated animation of the picture to make it appear like the character is speaking. Not only does this get students creating and communicating, but it can be a safe way to build student confidence in their own voices, and it’s also a lot of fun.
- ChatterPix Kids: This iOS app is ideal for even the youngest learners. First, choose a picture or take a photo. Then, draw a mouth with your finger and record your audio. The mouth you drew will move with your voice as the audio is played back. You can even add stickers onto the character to dress it up. Make anything speak―an animal, your friend, or even an object like a spoon.
- Blabberize: This works much like ChatterPix Kids, but it is both web-based and available as an iOS app. Upload a picture, draw a mouth, and record your audio.
Stop-motion animation is a lot like the early animation process used by movie studios. It is essentially the creation of a series of images that gives the appearance of movement. This is accomplished by creating a sequence of frames that shift at least one element of the image slightly from one frame to the next. When the series of frames is played quickly in sequence, the subtle changes from slide to slide simulate movement.
This effect can be accomplished by taking a series of photographs. Set up a scene with clay objects or plastic construction blocks, and then take a picture of it. Then, move at least one object a small amount and take another picture from the exact same location. Do this repeatedly, moving the objects in each frame a little more each time. While a few object options are mentioned above, anything that you can move will do. You could even draw a series of images and photograph each one. As long as you get a series of images that gradually change, it will work.
Once the photos have been taken, the next step is to stitch them together. This can be done with any digital tool that allows you to display the sequence of frames quickly, one after another, to give the illusion of motion. The simplest tools might be slideshow tools like Google Slides or Microsoft PowerPoint. When the frames of the slideshow are viewed quickly in sequence, the objects will appear to move, much like the frames of a film. Another option is to use video editing software to sequence the images before bouncing them down into a final video.
There are also specialized software programs available that will guide you step by step through the stop-motion animation process, but our list will focus on free tools that you can use to get started. If you want to explore more sophisticated options, a simple web search will reveal multiple options. Here are some tools to help you create stop-motion animations.
- Digital camera: To capture your frames, you can use any digital camera (even the camera on your smartphone or tablet). For best results, place the camera on a tripod or solid surface, so it doesn’t move between exposures. When transferring the images to your computer, be sure to keep track of the order in which they were taken, as you will need to be able to sequence them in this order when creating your animation.
- Video editing software: Nearly all video editing software allows you to insert and sequence images into a video editing timeline. As you put the images on the timeline, make the duration of each frame very short (a fraction of a second). Then, when you export your project as a movie, this quick movement from frame to frame will create the animation effect you desire. WeVideo (Tips) is an online video editing suite that allows you to create videos up to 5 minutes in length for free. While not essential, you can take your stop-motion video editing to the next level by adding in some green screen effects. If you record your animation in front of a green screen, you can replace the green background with an image or video of your choice. This process can add a little extra fun to your final product. This slideshow by Todd Burleson walks you through how you can use this process.
- Slideshow: If you don’t have video editing software, you can use digital slideshow software, like Google Slides or Microsoft PowerPoint, to create your animation. In fact, this is a fairly simple way to create your first animation. Start by creating a series of slides. If you have taken a series of pictures, add one image to each slide. Ideally, the pictures will take up the entire area of the slide. If you did not take pictures, you can create an animation effect right within the slideshow software. To do this, create an image with at least one element you wish to move. A simple example is to place a circle shape on the page. You can set this up to simulate a bouncing ball. Once your main slide has been designed, duplicate it, and then move the object slightly on the new slide. Repeat this process until your animation is finished.
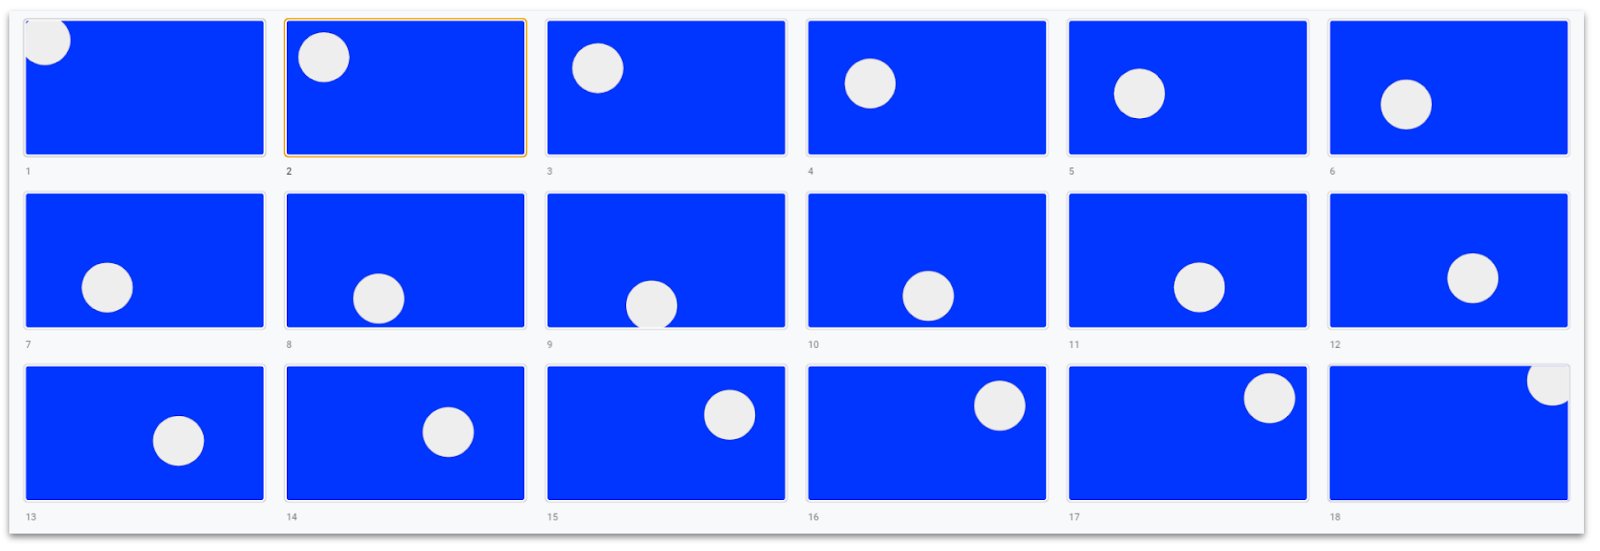
This image shows an example of using a series of slides to create a simple, bouncy ball animation effect. This can be a great introduction to animation and a building block for more sophisticated projects to follow. This short video from Emtech ecsd does a nice job illustrating how the slideshow animation process works.
Once you’ve finished the animation sequence, you can export each slide as individual images if you want to create the final video using video editing software. However, you can produce the animation right in the slideshow software if you wish. Simply present the slides full screen in rapid succession to produce the animation effect. If you want to automate this, you can publish the slideshow to the web, select your speed, and then set it to start playing automatically. To capture your final animation as a video, you can record your screen with a screen capture tool, like Loom (Tips).
- Apps: Certain apps, like Stop Motion Studio for iOS, can streamline this process and make it more accessible to younger students. These apps are specifically intended to help you create stop-motion animation, and they automate the process of stitching your pictures together into the final animation. Stop Motion Studio and other apps like it typically allow you to add your own voice to the finished animation if desired.
Animated GIFs are short, repeating video clips or moving images. There are a couple ways to create these. One technique pulls a series of frames from a movie and repackages them into an animated image that can be embedded in other digital platforms. Rather than describing this as creating an animated image, it’s probably more accurate to describe it as capturing a short segment from a video. The other option is similar to stop-motion animation, where you take a series of images and stitch them together to create the appearance of movement. There are a variety of tools available to help you create an animated GIF.
- GIPHY: This simple website pulls clips from GIPHY, YouTube, or Vimeo, and you can choose the starting point and duration of the clip. You must create an account to create your own video, and all videos remain public.
- Creator Studio: This simple add-on to Google Slides is great for creating GIFs. Create your sequence with one picture per slide. Choose to make a GIF, Image Sequence, or Video File, and then download the final product.
- Tall Tweets: This tool is similar to Creator Studio and allows you to turn Google Slides presentations into GIFs and videos. Create your slides and export with this add-on.
- Clipchamp (Tips): This video editing tool offers an export option specifically for the purpose of creating GIFs.
- Adobe Photoshop: This industry-standard software program can be used to create animated GIFs. However, this is a premium product requiring purchase and install.
Several video software tools do the animation work for you. You determine your message and choose the animation options built into the tool, and then let the software do the animating.
- Powtoon: Create cartoon animations that can be exported as a video. The free version allows up to 3 minutes of HD video (and 100 MB of storage). While you can only access the free templates, music, and creative elements, these are likely enough to get you started. Finished products will also include the Powtoon branding. This is a good option for students who might be camera shy or are looking for a safe way to get started creating.
- mysimpleshow: Create explainer videos in a whiteboard animation style. There is a four-step process where you draft, write, visualize, and finalize. Once you have created your script and made your visualization choices, mysimpleshow puts it together, complete with narration. Free videos are published as public videos and are accessed with a link.
- Animoto: Create videos in an animated slideshow format. Add slides, and then drag and drop images, text, music, and other template content into the frame. Adjust the timing for each slide and export as a video. With the free plan, you can create unlimited videos in standard quality (720p) and choose from 50 music tracks, three fonts, and 30 color swatches.
These tools are specifically designed for creating animations, and they offer some of the most robust creative options available. While some are suitable for every level of learner, others offer further features to challenge more advanced learners.
- Animaker: This online tool includes drag-and-drop functionality to help you create a series of scenes that can be turned into an animated video. This is a freemium tool, offering some elements for free and additional ones for a fee.
- Blender: This is a comprehensive, professional-grade 3D creation suite that is open-source and free. This is an ideal option for students who want to dive in more deeply to the art of animation and 3D modeling. This tool requires a download and local installation.
- OpenToonz: This is free animation software for creating 2D videos. It is open-source and includes a wide range of features.
- Pencil2D: This is another product that requires a local install. It allows you to create hand-drawn 2D animated videos. It is both robust and accessible to beginners.
- Animation & Drawing by Do Ink: This iOS app is great for introducing younger learners to the concept of animation.
There are many computer coding programs available to students of all ages. Not only do these programs allow students to create exciting animations on their computer screens, but they are also excellent gateways into the rich world of computer coding. Here are three free coding options to get you started.
- Scratch (Tips): Program your own interactive stories, games, and animations with this free tool from MIT. While designed specifically for students aged 8–16, older students may also enjoy it. This tool provides a great introduction to coding as well as animation and storytelling. Use it online or download the app for Windows. There are many free curriculums and tools to help students with animation in Scratch. For example, Google CS First provides a free unit on Storytelling Using Scratch. BootUp Professional Development also has many free resources and Scratch lessons that you can use. A good place to get started is this lesson for animating your name with Scratch.
- ScratchJr: This is a free introductory programming application that can be downloaded in both iOS and Google Chrome. ScratchJr was inspired by Scratch and still allows the creation of interactive stories, games and animations, but it was developed to be more appropriate for younger children and developing readers. Although designed for younger children, it is a great tool to use with beginners no matter their age. BootUp Professional Development has free ScratchJr lessons and resources for you to explore and use in your classroom.
- Code.org Sprite Lab: Similar to Scratch, users apply block-based programming to create animations and games that interact with one another. Sprite Lab is web-based and free. Any creations can be shared with a code or even sent to a phone.
Extend Your Learning
- 10 Reasons to Use Animation in the Classroom (ASCD)
- Animation in the Classroom – Developing Skills in Animation (National Improvement Hub)
- Websites and Apps for Making Videos and Animation (Common Sense Education)
- Animation (PBS and KQED Education)