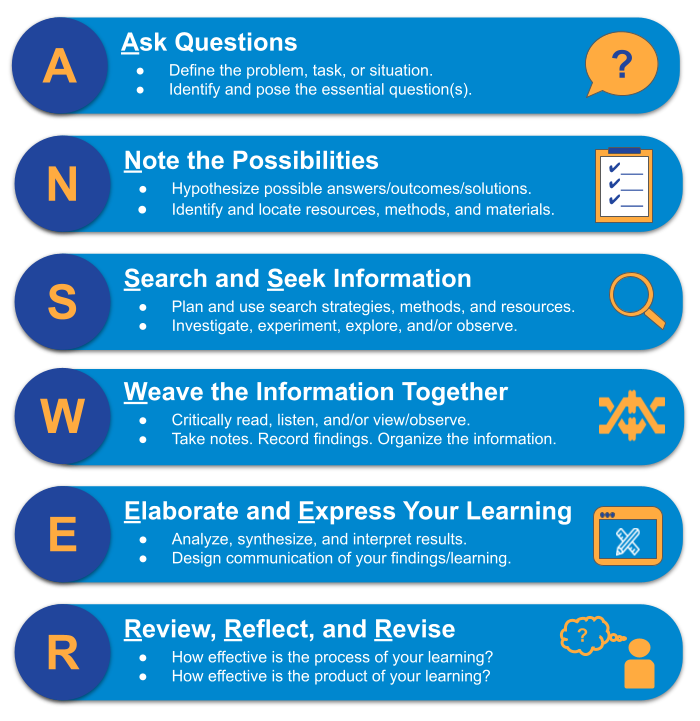
During the first steps in the ANSWERS inquiry learning process, students asked questions, noted the possibilities, sought out information, recorded their findings, designed a product or presentation, and used feedback to make necessary revisions. They are now ready to share and celebrate what they learned.
The seventh step is where student learning takes wings. Through the sharing process, student learning is transformed from something that benefits the individual student doing the inquiry to something that affects a broader audience. This sharing amplifies the impact of the student work.

To effectively share learning with others, students will need to both prepare and present/publish what they learned. Because this process is not completely linear, students will also be weaving back to earlier steps as they finalize their message and communication strategy. They may discover a gap in their learning that requires them to circle back to the Search and Seek step, or they may discover another key question that they hadn’t initially considered. This is not only acceptable but also desirable and adds to the authenticity of how learning happens outside of a structured school setting.
The benefits that students gain when sharing their learning are wide-ranging and important. The following list can help us (and our students) better understand why it’s so important to share what we’ve learned.
Because the product is public, students are likely to care more deeply about the outcome and the quality of their public product. Students won’t want to be negatively perceived, such as looking unprepared, by people in the “real world.” This shifts the motivation from grades (which can be artificial and extrinsic motivators) to capturing a positive audience reaction (which is much more authentic and intrinsic).
Because students have all completed the inquiry process, they have gone through a common set of struggles. Because of this, they will likely be more empathetic listeners and viewers. This shared experience can give them valuable perspective as they listen and see what their peers have done. In the process of preparing and presenting to a targeted audience, they will also build upon the empathy that they gained during the audience analysis aspect of the Elaborate and Express step.
Presenting their findings provides students with another opportunity to build understanding and increase retention. In order to teach a topic, students will need a higher depth of understanding about their topic, and studies have shown that teaching something greatly improves retention. We experience this as teachers, sometimes not realizing gaps in our understanding until we are teaching it. This is okay, as it’s part of the learning process and a valuable experience for our students.
During inquiry learning, students should be learning as much about the process of learning as they do about the academic content. These are important life skills that will serve them long after they leave our classrooms. When students get feedback from an audience, it can help inform them in thinking about their inquiry and thinking processes. This feedback can come in the form of audience reaction, judges’ comments, listener questions, peer feedback, or self-reflection. Seeing how their peers approached the work can also provide them with additional opportunities to get ideas and reflect on how they can approach their own work differently in the future. In fact, students should weave back to the “R” step of the ANSWERS inquiry process and intentionally review, reflect, and consider how they would revise their process the next time they encounter this type of experience.
The experience of sharing learning and engaging with an audience helps students build essential skills. First and foremost, they practice the art of communication, including effective writing, speaking, and active listening. Additionally, students develop skills in technology, design, and presentation. Engaging with an audience also strengthens interpersonal skills, such as collaboration, adaptability, and constructive feedback.
During the inquiry journey, especially for longer inquiry projects, students may experience the emotion of wanting to give up. If we can guide them to a successful end point where others see and celebrate their work, students often gain a sense of accomplishment, which they can use to fuel them through future, more rigorous learning. Successes that follow productive struggle lead to a great sense of pride and foster a growth mindset.
While some students will celebrate their accomplishments intrinsically, public sharing offers an opportunity for a public celebration of successful learning. Success often encourages future success, as it gives students confidence and a positive reward for their hard work. A public audience provides opportunities for accolades and positive feedback and can continue to reinforce a growth mindset.
Here are some tips and strategies that you can share with your students as they prepare and then present or publish their findings with others. To help guide your students through this step of the ANSWERS inquiry process, you can use the Share Your Learning With Others study guide and PREPARE to Share poster. Feel free to make copies of these templates and refine them as needed to best meet your students’ needs.
Prepare to present your findings/learning.

What do you need to do to get ready to successfully present or publish your findings?
- Identify tasks and action steps to be completed.
- Prioritize tasks from most urgent to least urgent and set deadlines. Focus on essential tasks.
- Create a checklist using a tool like Google Keep, Microsoft OneNote, or Taskade.
- Anticipate the unexpected. Plan on completing tasks early to avoid issues if something unexpected arises.
How well do you know the information you will share?
- Having confidence in what you know will bring you confidence when sharing your learning with others.
- Review your findings. If presenting, create note cards using templates like Adobe Spark Note Card Templates or using tools like Evernote or Google Keep.
What materials and technology do you need to set up?
- Identify, gather, and set up materials and technology needed for presenting or publishing.
- Consider backup options if you should encounter technology issues.
- Test the technology and practice using it to be sure that it is working as expected and needed.
- Check your Wi-Fi and Internet connection.
- Test the audio and video.
- Make sure that the device is fully charged.
- Reboot the device before presenting.
- Close all extra windows or tabs.
What do you need to do to get the space or stage ready?
- If it is a live presentation, visit the physical space and consider how you will arrange your “stage.”
- Spend time in the space to get comfortable. This will reduce anxiety when presenting.
- Test and practice using the technology in the space to get comfortable with the various pieces of equipment, like a microphone, a projector, or a panel.
- Consider the audience experience.
- If you are presenting live, be sure that the audience can see your artifacts, lab, text, or visuals from all areas of the room, including the back.
- If you are presenting virtually, test the screen sharing to be sure that the audience can see your materials. Are your text and visuals readable? Be aware of backlighting issues. Adjust the space so that light sources, such as windows and lamps, are in front of you.
- If publishing online, review your project on different devices to be sure that the user experience is as expected.
What do you need to do to prepare for your specific audience?
- Revisit the audience analysis that you completed in the Elaborate and Express step to ensure that your information and delivery will engage and appeal to them.
- Who is the targeted audience?
- What does the audience already know about the problem, task, or situation?
- How does the audience feel about the topic?
- What is their level of interest in the topic?
- What are their expectations for the presentation?
- What relevant demographic information should be considered, such as age, gender, background, and level of education?
- Consider your audience experience.
- Can they hear you and see the visuals regardless of where they are sitting in the audience?
- Can they navigate and see the information that is published online, regardless of the device they are using?
- Are the share settings set for them to access needed resources?
- Engage the audience.
- Grab their attention by opening with a quote, scenario, story, or interesting fact or statistic; an intriguing question; an interesting prop or visual; or a bit of relevant humor.
- If presenting via videoconference, leverage the chat and Q&A features within Microsoft Teams, Google Meet, or Zoom.
- Create backchannel opportunities for the audience to submit questions, add comments, or discuss the topic by using tools like Google Slides Q&A, Mentimeter, or Padlet (Tips).
How and when will you rehearse?
- The more you practice, the more you will be confident and comfortable.
- Rehearsing also helps reduce anxiety, which is a natural emotion that we experience when presenting.
- Nerves are normal; they are a signal that your body is preparing itself.
- Recognize how your body is responding and practice using positive self-talk to calm the nerves. Talk to yourself like a cheerleader who is excited to see you perform.
- Realize that the physiological reactions you’re experiencing are the body’s way of helping you prepare for peak performance (more oxygen, adrenaline, etc.).
- Taking slow, deep breaths can slow your heart rate if you need to calm yourself. Use mindfulness resources, like Mind Yeti (Tips), for relaxation.
- Remind yourself that everyone feels nervous presenting and that others want you to succeed and are there to support you.
- Talk to someone about how you are feeling. Saying our fears aloud to a friend or family member can help reduce our anxiety.
- If the anxiety is acute, reach out to your parents/guardians or a counselor for support.
- Practice on your own in front of a mirror as well as in front of family, friends, and/or peers.
- Practice going slow, as you will naturally speed up when presenting. Build in pauses to avoid using fillers like “um” and “like.”
- Practice using your notes. The notes should serve as cues. Avoid reading the notes, as your audience will be more engaged by your more natural, conversing style.
- Practice vocal variety to avoid being monotone (vary your tone, volume, and pace of voice).
- Practice using gestures and making eye contact. Practice having strong posture and confident body language (avoid fidgeting).
- If presenting live, practice the entire process of presenting: stand up, walk to the front, present, return to your seat, etc.
- If presenting virtually, practice presenting in the videoconference tool that you will be using.
- Record yourself practicing. Watch the recording and consider how you can improve your presentation. For Zoom, Google Meet, or Microsoft Teams, use the record meeting feature to record yourself.
- Visualize a positive experience. See yourself in your mind presenting a great presentation.
How will you know when you are ready to present or publish?
- Identify indicators that will let you know when you are ready to share your learning.
- Some example indicators include: I know the information well. I have tested the technology. I looked at my published product on all devices. I have rehearsed the presentation until I feel confident.
- Once ready, see the tips below for presenting or publishing your findings.
The will to succeed is important, but what’s more important is the will to prepare.
– Bobby Knight, basketball coach
Present or publish the product of your findings/learning.
Below are some tips and questions for your students to consider as they present or publish their findings.
- Dress appropriately for the setting.
- First impressions are important.
- Dressing up also puts you in a more professional and confident mindset for presenting.
- Arrive early.
- This will give you time to ensure that equipment is working and your space is set up as expected. You will then have time to make any adjustments, as needed.
- Being in the space before the audience arrives will also help reduce nerves.
- Energize and focus yourself.
- Prime yourself to be in a zone to perform.
- Listen to high energy or calming music.
- Give yourself a positive pep talk in front of the mirror.
- Walk around the hallway, swing your arms, or jump up and down—whatever works for properly energizing yourself.
- Rehearse one final time to a wall or in front of a mirror.
- Be yourself and have fun!
- You prepared hard and are ready for this moment!
- Smile! It not only will ease your anxiety, but it will make you more inviting to the audience.
- Find a friendly face in the audience who boosts your confidence.
- Be positive, enthusiastic, and confident, and show your passion for your work.
- Show your personality. Speak to, and not just at, the audience. It will make you more approachable and earn you respect from the audience.
- Present with confidence.
- Make eye contact, use purposeful gestures, and display confident body language.
- Be prepared for the unexpected. Use humor, and don’t let it shake you.
- If you make a mistake, don’t let it derail you.
- If it is a delivery mistake, likely no one will notice it. Move on.
- If it is a factual mistake, acknowledge it, correct it, and move on. None of us are perfect! Your audience will respect your integrity in making corrections.
- If someone points out an error, thank them for the feedback. View this experience as another learning opportunity rather than a failure.
- Celebrate and continue to learn.
- When done, reflect on what worked well and celebrate your accomplishment.
- Also reflect on opportunities to be better next time.
- Use this as another learning experience.
- What feedback does your audience provide?
- Watch other presentations.
- What works well in their presentation that you could do in a future presentation?
- Support and celebrate your peers.
These additional tips will help when presenting via videoconference on platforms like Zoom, Google Meet, or Microsoft Teams.
- Review the tips above for presenting live.
- Carefully consider your background.
- Avoid clutter and distracting visuals.
- If you don’t have a good background, use built-in backgrounds available in Microsoft Teams, Zoom, and Google Meet.
- Be sure that light sources, like windows, are behind you to avoid backlighting issues.
- Find a quiet spot.
- Use a headset with a microphone to avoid picking up room noises.
- Turn on features that cancel background noise (see directions for Google Meet, Microsoft Teams, and Zoom).
- Let your family know that you are presenting, so they don’t interrupt.
- Check the technology: See “Equipment” notes in the “Prepare” section above.
- Look into the camera when speaking.
- Set the camera so that you are looking eye level to your audience.
- If using notes, tile your windows and place your second screen so that you minimize looking away from the camera.
- Leverage the chat and Q&A features to interact and engage your audience.
The following design tips will help ensure that your audience finds your creation both appealing and accessible.
- Keep your content and message clear and concise.
- Be consistent in your design.
- Use consistent font styles, sizes, and color.
- Use consistent background styles, colors, or themes.
- Use animations and consistent transitions that support, rather than distract from, the message.
- Use white space and create balance.
- Use white space to create visual breaks. This will add to clarity and visual appeal.
- The elements on the “page” should be visually balanced, both vertically and horizontally.
- Place related items near each other (in close proximity).
- Placing related items near each other will tie them visually together.
- This will help avoid visual clutter and confusion.
- Use visuals and multimedia that add meaning or clarity.
- Incorporate relevant pictures, charts, graphs, icons, illustrations, and videos.
- Caption or tag visuals for accessibility.
- Design for accessibility and intuitive navigation.
- Create contrast between text and background.
- Avoid red and green for those who are color-blind.
- Use legible fonts.
- Avoid ALL CAPS and script fonts.
- Use serif fonts, like Times New Roman, for print publications.
- Use sans serif fonts, like Arial, for digital publications.
- Consider font size.
- Use 10+ for viewing in print.
- Use 16+ for web viewing.
- Use 22+ for room viewing.
- For hyperlinks, use blue font and underline.
- Design for clear navigation that avoids too much clicking.
- Confirm that the share settings are set as needed, so your intended audience can access it.
The best way to sound like you know what you’re talking about is to know what you’re talking about.
– Harvey Mackay, author
Student Reflection
After your students present or publish their creation, it is important that they take a moment to revisit the reflection questions that were part of the “R” step. Their reflection should include both the process and the product of their learning, with an emphasis on the process. These reflection questions could include:
- What strategies did you leverage that worked well for you?
- What challenge did you experience, and how did you overcome the challenge?
- What can you do differently and improve upon for next time?
- How have your knowledge and skills grown?
- What are your next steps to continue developing your skills and knowledge?
- What are your future goals for using these skills?
Teacher Reflection
As you wrap up an inquiry learning experience with your students, this is also a great time for you to pause and reflect on the design of your instruction. Ask yourself the same questions that you ask your students: What worked well? What would you do differently next time? Since we know that having our students do something only once will not help them master the skills, it will be important to provide your students more inquiry learning experiences. What have you learned from this experience that will inform how you design your students’ next inquiry learning?
As you reflect on this experience, also consider how you can further empower your students during their next inquiry learning. If this was their initial experience with inquiry learning, you likely provided them with more guidance, structure, and scaffolding to help them be successful. However, now that they have some experience, skills, and confidence, it will be important to release more of the responsibility for the learning over to your students. How can you empower them with more voice and choice in their inquiry? For example, perhaps they can have more ownership in picking what they will learn, how they will learn it, and with whom and how they will share their learning.
It is also important to consider how you can increase the rigor for your students. Educator Trevor MacKenzie describes four types of student inquiry that range from very structured, teacher-driven inquiry to free inquiry that is completely student-driven. He compares these types of inquiry to learning how to swim: You start in the shallow end with lots of support and work your way to the deep end with the goal of becoming a strong, independent swimmer who can swim in any type of water. As you reflect on this inquiry experience and the design of the next inquiry learning, consider how to gradually release more responsibility to your students. How can you support and push your students to “go deeper,” so they can become stronger and more independent inquiry learners?
Extend Your Learning
- Inquiry-Based Learning: From Teacher-Guided to Student-Driven (Edutopia)
- Students Should Share Their Process, Not Just Their Product (John Spencer)
- What Happens When Students Launch Their Work to an Audience? (John Spencer)
- Best Practices for Virtual Presentations: 15 Expert Tips That Work for Everyone (Forbes)