Responding to art involves understanding and evaluating how art conveys meaning, and this does not happen in isolation. It mingles with all of the other topics in this collection: creation, presentation, and connecting. This interaction reminds us of the importance of having students give and receive feedback during the process of creating and consuming art. When students receive feedback from others, they can identify both strengths and areas where they can grow as artists. This is vital to the self-improvement process. Conversely, when students give feedback, they must think critically and use complex cognitive skills, such as evaluation and synthesis. To provide meaningful feedback, they must reflect on all that they know about art, apply it to a new piece of work, and analyze it in those terms. Once they have formed a supported opinion, they must apply communication and collaboration skills to provide that feedback positively and effectively to another artist. This give-and-take of ideas and interpretations is incredibly powerful and can help your students develop important life skills. As they go through this process, students will have opportunities to grow socially, academically, and emotionally.
The National Core Arts Standards breaks responding into three anchor standards:
- Perceive and analyze artistic work.
- Interpret intent and meaning in artistic work.
- Apply criteria to evaluate artistic work.
National Core Arts Standards © 2015 National Coalition for Core Arts Standards.
Rights administered by State Education Agency Directors of Arts Education (SEADAE).
All rights reserved. www.nationalartsstandards.org.
The following resources support the process of responding to art. Since this step can take many forms, we’ve provided you with a variety of resources. Each resource list is accompanied with a brief explanation of how it fits into the experience of responding to art.

Online galleries and museums are great places for students to experience the work of professional artists, and it gives students a safe place to begin evaluating and responding to the work of others. The analysis of these models can educate, inspire, and empower students in the creation of their own artistic work. Here is a list of some popular options to get you started, but don’t stop here. If you aren’t finding exactly what you’re looking for from this list, search online for resources that align to your classroom needs. There are many more sites out there for you to discover and explore. Some of the following resources are links to specific museums and galleries, and others are lists and directories.
Museums and Galleries:
- Asian Art Museum
- Brooklyn Museum
- Louvre Museum
- The Metropolitan Museum of Art
- The Museum of Modern Art (MOMA)
- National Gallery of Art
- Rijksmuseum
- Van Gogh Museum
Lists and Directories:
Before students can respond to each other’s art, they must first share it. Within a different article in this AVID Open Access collection, we explored options for sharing art. Rather than repeating that same information here, we’ll recap the top options for sharing art with technology. To learn more about each of these areas of technology, explore the AVID Open Access article, Present Art Using Technology:
- Blogs
- Digital Art Walls
- Discussion Boards
- Portfolios
- Publications
- QR Codes
- Slideshow Presentations
- Videos
- Websites
Once students have access to art from either their peers or professionals, they can begin to examine, critique, and provide feedback. At this stage in the process, students must apply their critical thinking and communication skills.
To structure this activity for your students, consider how you want them to share their feedback. This can be done in person, virtually, or with the combination of these two delivery options that you feel will best meet the needs of your students. In-person connections are essential in any classroom, and there is also a meaningful place for digital responses. As you plan, consider these six benefits of implementing a digital feedback system:
- It can be done asynchronously. This allows students to provide feedback when they are ready to do so rather than when the calendar or clock says that it’s time.
- It allows think time. When students are asked to respond in person, they often don’t have time to fully process their answers. They feel the pressure of saying something, even if they’re not yet ready to do so. Digital responses allow students to more fully process their thoughts and then communicate them in a digital format.
- It promotes more concise and productive feedback. Because students have more time to think through their responses, their replies have the potential of being more thoughtful. They can also rerecord their responses multiple times to get it right and capture a supportive tone of delivery.
- It allows students to communicate in their preferred format. They can choose text, video, visual annotations, audio, or screen recordings. This flexibility allows them to offer their most effective form of communication.
- It is recorded. This can be helpful for both the student and the teacher. Students can go back and review the feedback of their colleagues, and teachers can review the feedback as time allows, which is advantageous for both feedback and grading purposes.
- It sets up a more productive face-to-face meeting. Even if students respond digitally, it’s still very beneficial for them to meet and share in a face-to-face setting. By having time to prepare their thoughts ahead of time, students will have more complete and thoughtful ideas to share when they do meet in person. This experience also gives them a chance to get off of their devices and practice their communication and interpersonal skills.
There are multiple options for having students share their feedback digitally. Some have already been introduced in the AVID Open Access article, Present Art Using Technology, since many of these tools are designed for both presenting and responding. If you can find a tool that does both, it will simplify the process for everyone and allow students to spend more time evaluating and sharing rather than navigating digital platforms. It’s always beneficial to streamline processes when possible to reduce any unnecessary cognitive load.
The following options for presenting also often work well for responding digitally to other artists. Most of these tools have integrated reply buttons that students can use to easily respond to an initial artist post:
- Blogs
- Digital Art Walls (like Padlet)
- Discussion Boards
- Video Discussions (like Flip or VoiceThread)
The following presentation options likely do not have integrated response options:
- Portfolios
- Publications
- QR Codes
- Slideshow Presentations
- Videos
- Websites
While these are still great options for having students share their art, you will probably need to find a secondary tool or process that allow students to respond to each other. Here are some options to consider:
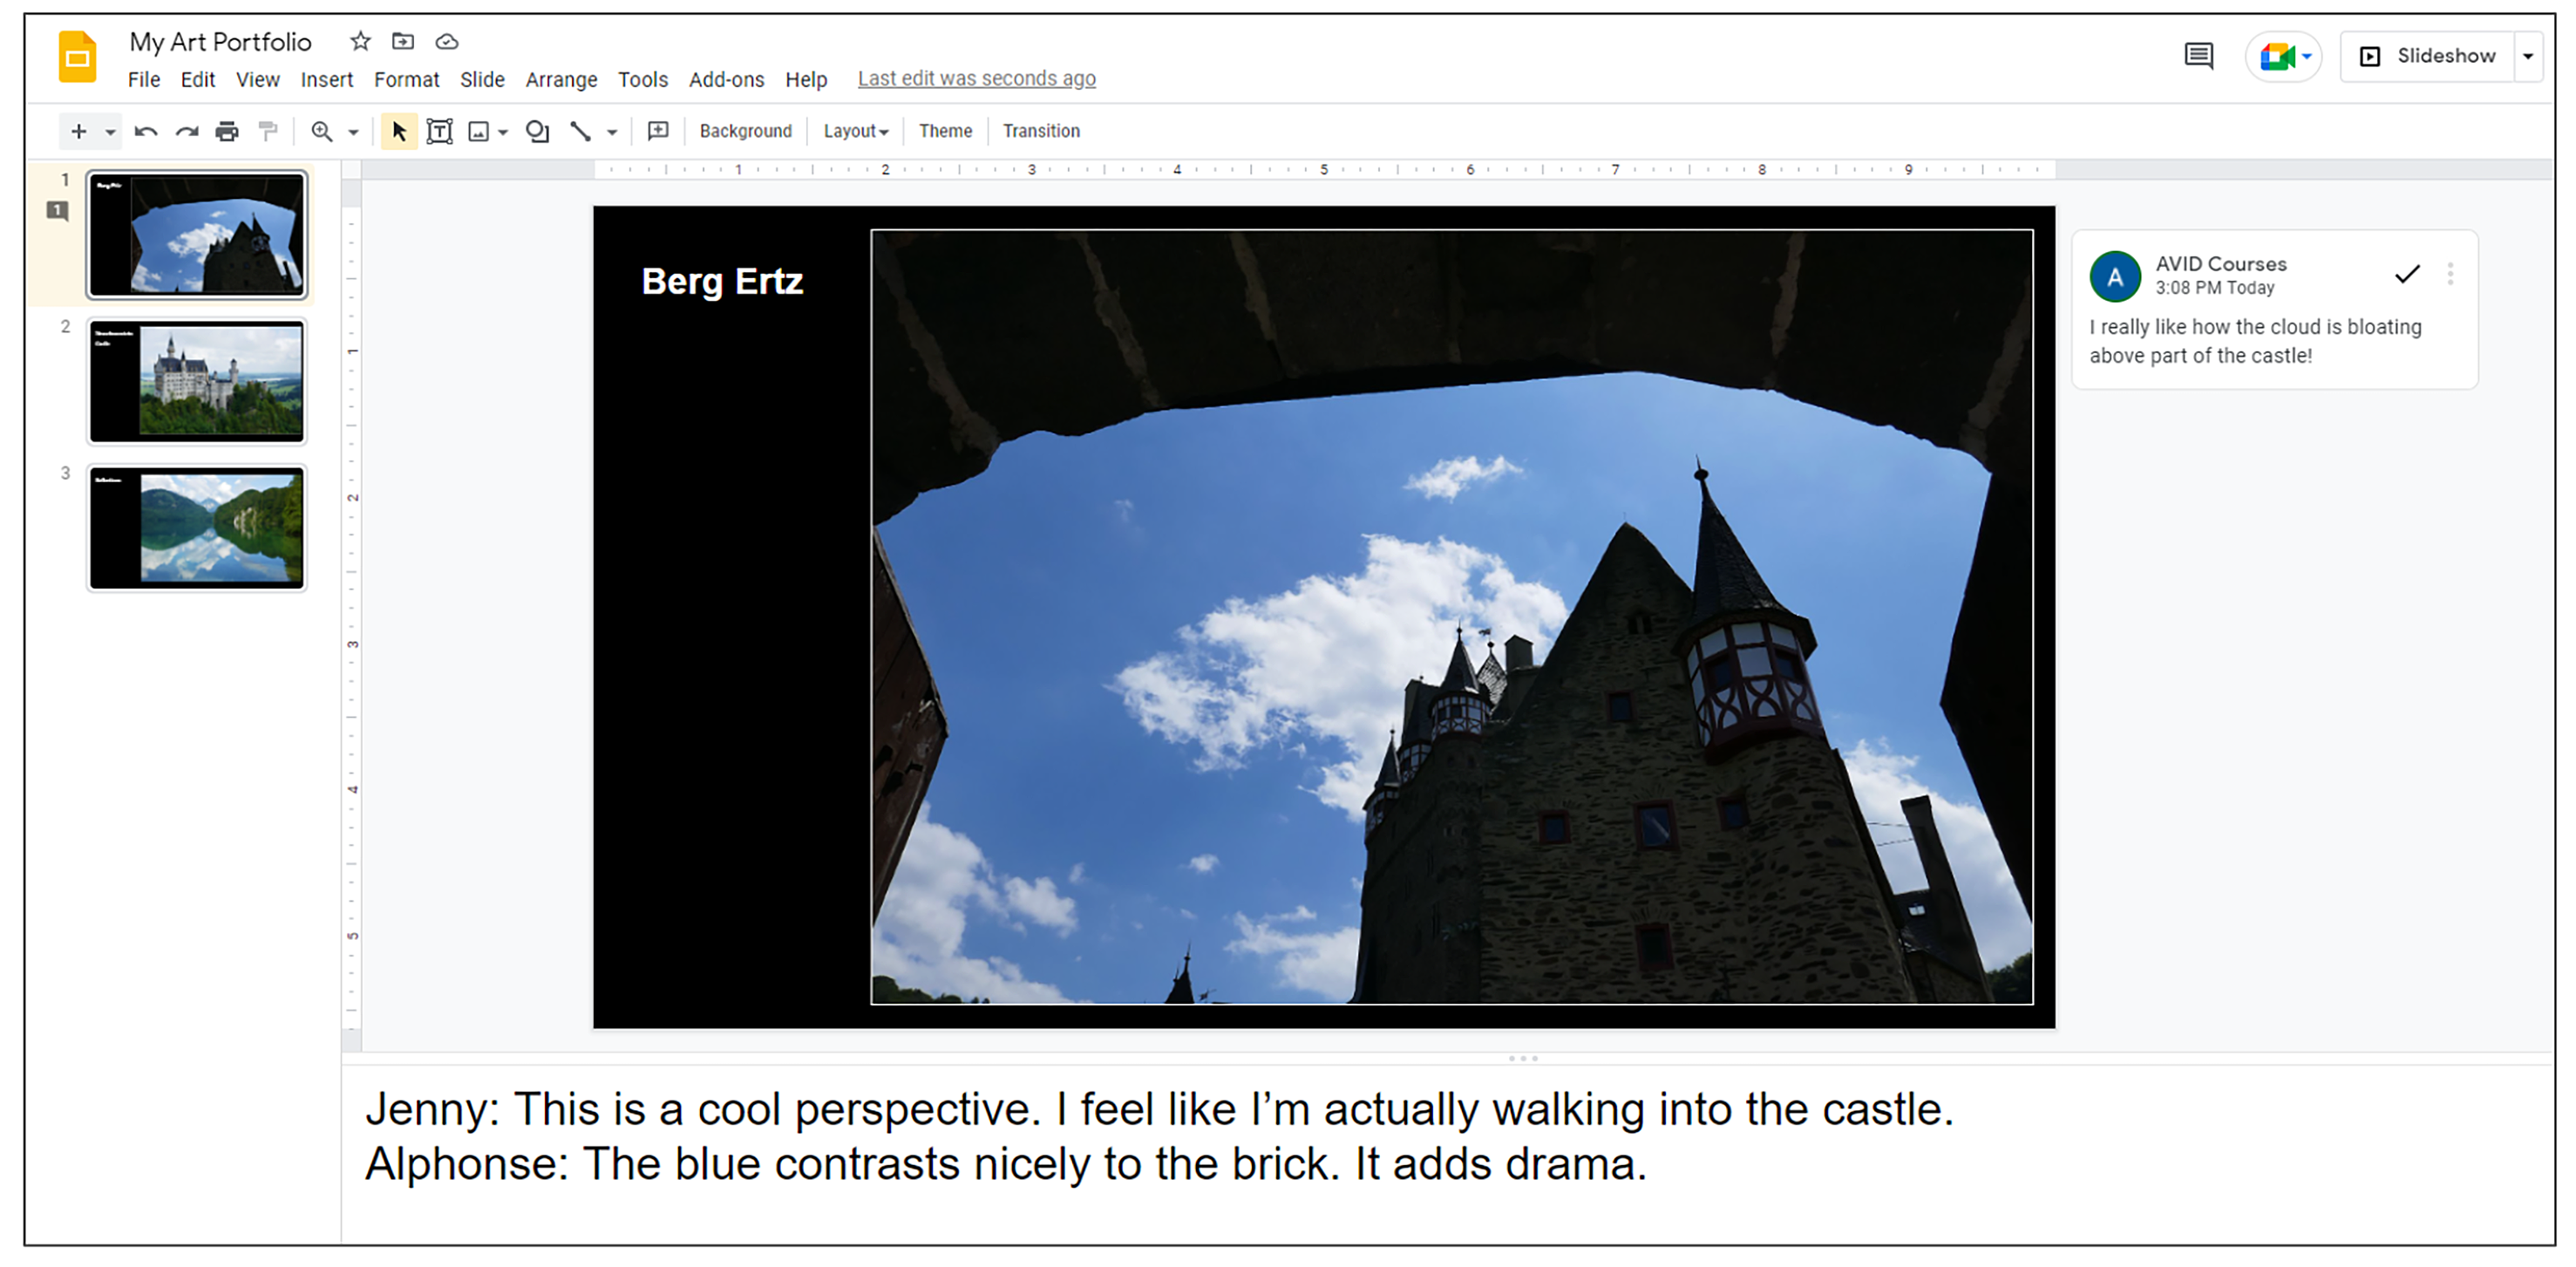
- Comment Options on Collaborative Documents and Slideshows: If students have inserted pictures of their artwork into a digital document or slideshow, they can use the integrated comments and feedback functions to provide notes in the margins of that document. Another option is to insert comments directly on the document using color-coding to call out comments. Students can also tag comments with their name to identify themselves. For slideshows, students can put comments in the speaker notes section at the bottom of each slide. This allows for easy access by the artist and keeps the canvas area neat and uncluttered. However, if you choose to use this option, students will need to give editing rights to their reviewers or adjust the share setting to allow “anyone with the link to edit.” When students are logged in, their comments are tagged to their names. This provides teachers with a convenient way to track comments, as well as address potentially concerning posts.
- Discussion Boards: Students can respond here even if the original material was posted somewhere else. When possible, it’s helpful to provide a link in the discussion thread to the artwork being critiqued. Sometimes, an image can be directly embedded into a post. However you do it, having the visual readily available removes a barrier for the students doing the review; they can get straight to the work of responding rather than trying to track down the artist’s work. Depending on the discussion board platform, students may be able to respond by providing text, images, videos, audio recordings, or links.
- Email: Students can email each other comments and feedback. This is private and personal, which can be appealing to students. One limitation of this approach, however, is that the teacher has limited access to the responses and cannot filter out potentially hurtful or inappropriate comments. You could choose to have your students copy you on each message, but be advised that this may quickly fill your inbox.
- Polling Tools: This can be a great choice for collecting both asynchronous and synchronous responses. If you are using these asynchronously, you can provide a link to a review form and include a field for entering or selecting participant names. This will allow you to identify the artists and the reviewers and also help you filter through the responses later. Many of these tools can work well, too, in a large-group, real-time setting. When you use a polling tool this way, students will view the artwork as a class, and then the teacher provides access to the poll for students to respond all at once. Most of these tools quickly aggregate responses into charts, graphs, word clouds, and more. The following are some popular and effective polling tools:
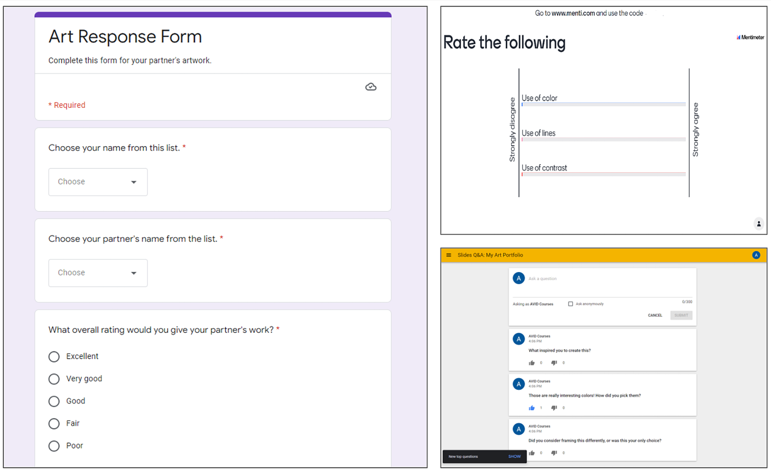
- Google Forms: This is a very versatile survey and polling tool that can be delivered in multiple ways: link, embed code, or email. It can also be used both synchronously and asynchronously. Create your form, and then analyze the results by reviewing comments, instant graphs, or the corresponding spreadsheet. Question types include multiple-choice, true/false, matching, scale, essay, date, upload, and more.
- Google Slides Q&A: This feature allows the audience to ask questions during a Google Slides presentation. Viewers see a link at the top of the presentation to the Q&A form. They access the link, submit a comment or question, and are then allowed to vote up questions they want to see answered first. Since it is more open-ended and text-based, this tool may be more useful for asking the artist questions than providing an aggregated rating-style evaluation.
- Mentimeter: Create polls, word clouds, scales, Q&A opportunities, and more. Insert two questions per slideshow for free. Share this in person during a slideshow presentation or send it out for asynchronous completion. Analytics and multiple question types are available.
- Microsoft Forms: This tool is very similar to Google Forms and is available to Office 365 Education customers. Create your form, choose your questions, view analytics, and export results to a spreadsheet if desired. Forms can be delivered in various ways and are accessible on nearly any computing device.
- Poll Everywhere: Create a slideshow of student art and use Poll Everywhere to add interactive questions directly into your slideshow. Choose from multiple question types, access analytics, and view results in real time.
- Slido: This tool also allows you to embed live polls into your slideshow. With Slido, you can run a competitive leaderboard and use a live question and answer feature. You can access an overview video and their Community and Help Center for more details.
In summary, as you prepare your students to respond to art, consider how you can leverage the power of technology to have them discover art to review, share their own work with others, reflect, and provide meaningful and timely feedback.