Once you have your ideas collected and organized, it’s time to start drafting your message. The work you have done during pre-writing will guide you as you write your first draft, and it will help to make your efforts more efficient and effective. While you may still struggle with some of your less-developed ideas, and you may have to loop back to some of your pre-writing decisions, having a solid plan will provide you with meaningful direction as you write. Think of it as mapping out your trip before you head out on the road. If you know where you are going and why you want to get there, you will be able to drive with purpose. While your trip may still include detours and some unplanned—but beneficial—new stops, you’ll almost certainly make fewer false starts and take fewer wrong turns.
To start writing, you will need to choose a writing platform, and your specific choice will be shaped by your intended format. Most often, you will begin by using a word processing program, like Google Docs or Microsoft Word. Even if you plan to later place your text into a multimedia platform, like a website or blog, you may still find it helpful to draft the initial message in a word processing program since this will give you access to a powerful suite of tools specifically designed for writing.
Choose your tool.
You’ll often end up using the tool promoted by your school district, but sometimes, you might have a choice of several options. While most writing tools are similar, they do have a few functional differences. Be sure to explore the pros and cons of each platform and choose the one that will work best for you and your writing project.
Microsoft and Google are the two most popular options.
- Microsoft Word: Students and teachers can get the online version of Microsoft 365 for free. While this browser-based version has fewer features than the locally installed program, it should be sufficient for most writing purposes. Microsoft 365 is a popular choice for both schools and business. To get the full version with all the features, you must purchase the premium version and install it on a computer with the Windows operating system.
- Google Docs: This is another popular option for both schools and businesses. It may not have all the features of the fully installed version of Microsoft Word, but it is comparable to the online Microsoft 365 version, and it is free to anyone, not just students and teachers. Collaboration is also easier with Google Docs, and Google offers many third-party add-ons that can enhance the writing experience with additional functionality and features.
There are many other word processors available, including Zoho Writer (online) and LibreOffice (locally installed).
Tile your screen and prepare to write.
As you draft your message, you will use the outline you created in Step 1 as a guide. However, don’t feel locked into this initial plan. As you write, you may gain additional clarity about your message or rethink how you wish to communicate that message. This is common, and in many cases it’s ideal because it means you are continuing to develop your ideas. Remember that the writing process is messy and nonlinear, so it’s helpful to allow yourself to move back and forth between steps as you refine and improve your thought process. Digital tools can be lifesavers during the drafting process since they often allow you to quickly and easily move ideas around.
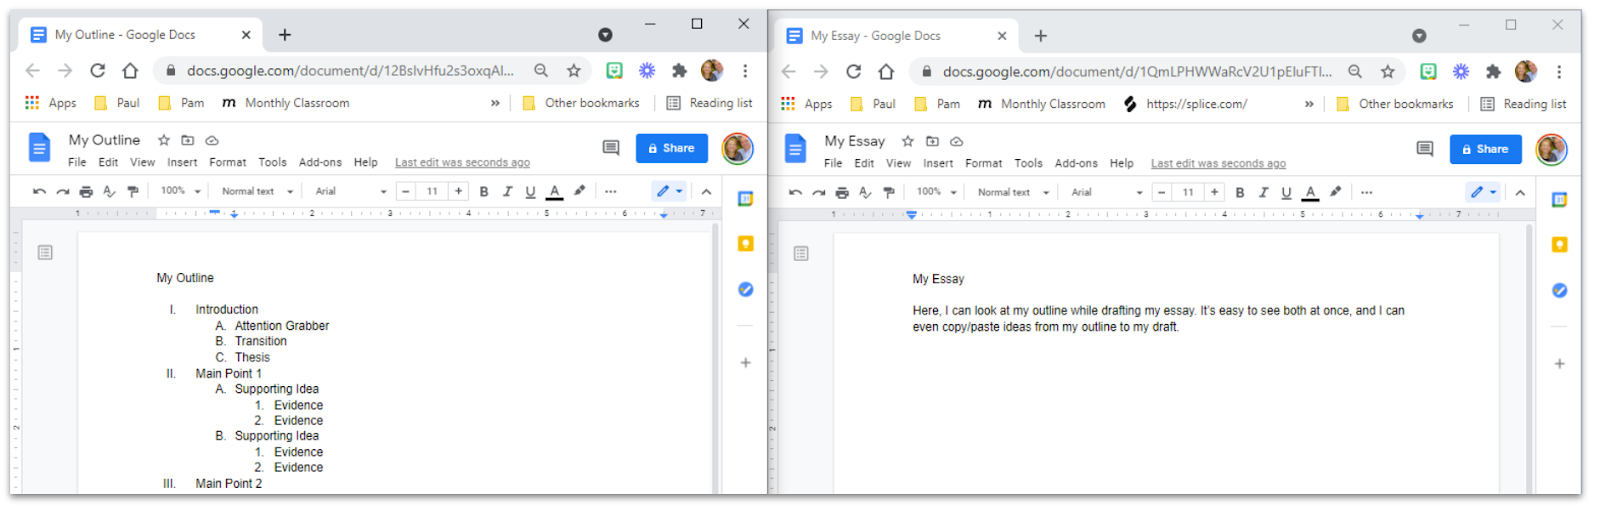
If your outline has been written on paper, you can lay it beside you as you type on the screen. However, if both your outline and draft are digital, it’s helpful to tile your screen, so you can see both documents at once. It also allows you to quickly and conveniently copy and paste ideas from your outline into your draft.
The process of tiling your screen will be slightly different depending on your device.
- If you are using a Chromebook, click and hold the “maximize button,” and then slide over to select one of the arrows. This will snap your window to that side of the screen. Then, pull off another tab by clicking on it, holding, and dragging it downward. Repeat the process for this tab and place it on the other side of the screen.
- On a Windows computer, select a window. Then, click the Windows key plus either the right or left arrow key. Repeat this process to place a window on the other side of the screen. You can click and drag windows to either side as desired.
- Mac users can hold down the green full-screen button and drag it to one side of the screen. Then, select the window that you wish to snap into the remaining space.
- On an iPad, you can view two different apps in split view by swiping up from the bottom edge to reveal the dock. Touch, hold, and drag the second app to one edge of the screen and release.
Use the integrated tools.
If you are using a word processor to draft your writing, you will have instant access to many integrated tools. These are usually quick and easy to access, and they’ve been built into the tool because they are the most useful and commonly used tools sought after by writers.
- Speech-to-Text: While it’s common to simply type text into your document, speech-to-text options can also be used. With this feature activated, you voice your ideas, and the speech-to-text program converts your words to text on the screen. This is especially helpful for those who don’t type well, but even proficient typists may find it faster to dictate their ideas than to type them. Some writers compose better if they can verbalize their ideas out loud, and these tools allow them to capture their ideas efficiently into text format. A speech-to-text tool can also be offered as an effective accessibility strategy and powerful differentiation option for students who need alternative ways to compose and input text. Google Docs includes a Voice Typing option under their Tools menu, and Microsoft Word uses their integrated Speech Recognition feature.
- Formatting Toolbar: Although this step is mainly about drafting and capturing ideas, you will probably be doing some editing and formatting along the way. The convenient shortcuts on the toolbar give you quick access to the most common tools, like alignment, font color and size, and text formatting. As you are drafting, it can be helpful to highlight ideas that you wish to revisit later. Maybe you have an idea but want to come back to develop it more completely after you’ve finished your first draft. The highlighter tools or comment feature can be great ways to tag these spots for future review and revision. You might even highlight an entire section with a different font color to make it easier to locate during revision.
- Cut/Copy/Paste: Again, you’re not in the editing stage yet, but you’ll almost certainly be moving things around as you compose. This is a natural part of the composition process. The cut/copy/paste feature might be the most powerful benefit of using a word processor to write and revise. When a draft is written out on paper, it can be very tedious to completely rewrite the work to create the next draft. However, when it’s easy—as it is when using a word processor—you will be much more likely to do it. It also promotes the idea of changing your thoughts as your ideas evolve, which can help foster a growth mindset. You should not look at your first draft as the final copy, and easy editing tools can encourage this positive mindset. You can make revisions quicker and easier with keyboard shortcuts. On a PC or Chromebook, you’ll use the Control key, while on a Mac, you’ll use the Command key instead.
- Control/Command + C = Copy
- Control/Command + X = Cut
- Control/Command + V = Paste
- Highlight, Click and Hold, Drag and Drop = Move
- Word Prediction: Not every tool includes word prediction, but it is becoming increasingly common. You might be most familiar with this in terms of text messaging, when your phone suggests words that you might intend to use next. This word prediction feature can be helpful when drafting a message. Artificial intelligence helps programs learn your tendencies and predict what you might want to say next. While we don’t want students to fall into the trap of using the same ideas over and over, this scaffold can be especially helpful for young writers, language learners, or students with learning disabilities. Using these tools is often as simple as clicking the Tab key to accept the suggestion that appears on the screen in front of your cursor.
- Version History: Hopefully, each revision of your work is better than the previous one. However, sometimes your new ideas may not be as good as your first ones, and other times, you may want to salvage one or two ideas from an earlier draft. Version history features in word processors let you go back in time and retrieve those earlier ideas. Google Docs lets you name each version, and Microsoft Word has a powerful feature for tracking changes.
- Thesaurus and Dictionary: Writers no longer need to carry around a thick, backbreaking thesaurus and dictionary. These are now conveniently integrated into almost all word processors. While you may return to these tools when revising, they can also be very helpful while composing. These features are often available through menu options or by highlighting a word and right-clicking on it.
- Collaboration: The ability to share documents virtually can be a game changer in the writing process. Writing partners can collaborate from different locations or use the sharing features to provide feedback during the drafting process.
- Spelling and Grammar Checkers: As mentioned earlier, you are not at the revision or proofreading stage yet, but integrated spelling and grammar checkers can still be very helpful during the drafting stage. If you can catch these mechanical errors when drafting, it will help you shift your focus during the editing stage from mechanics to ideas. This often leads to more substantial and helpful feedback. Mechanics are important, but the ideas are the heart of any writing. These integrated tools help to automate the low-level components of writing, allowing you to focus more fully on your message.
- Word Count: While this is not the most important writing tool, it can be very helpful when you are given an assigned length for a writing project. It can save a lot of time, which can then be spent on the actual writing.
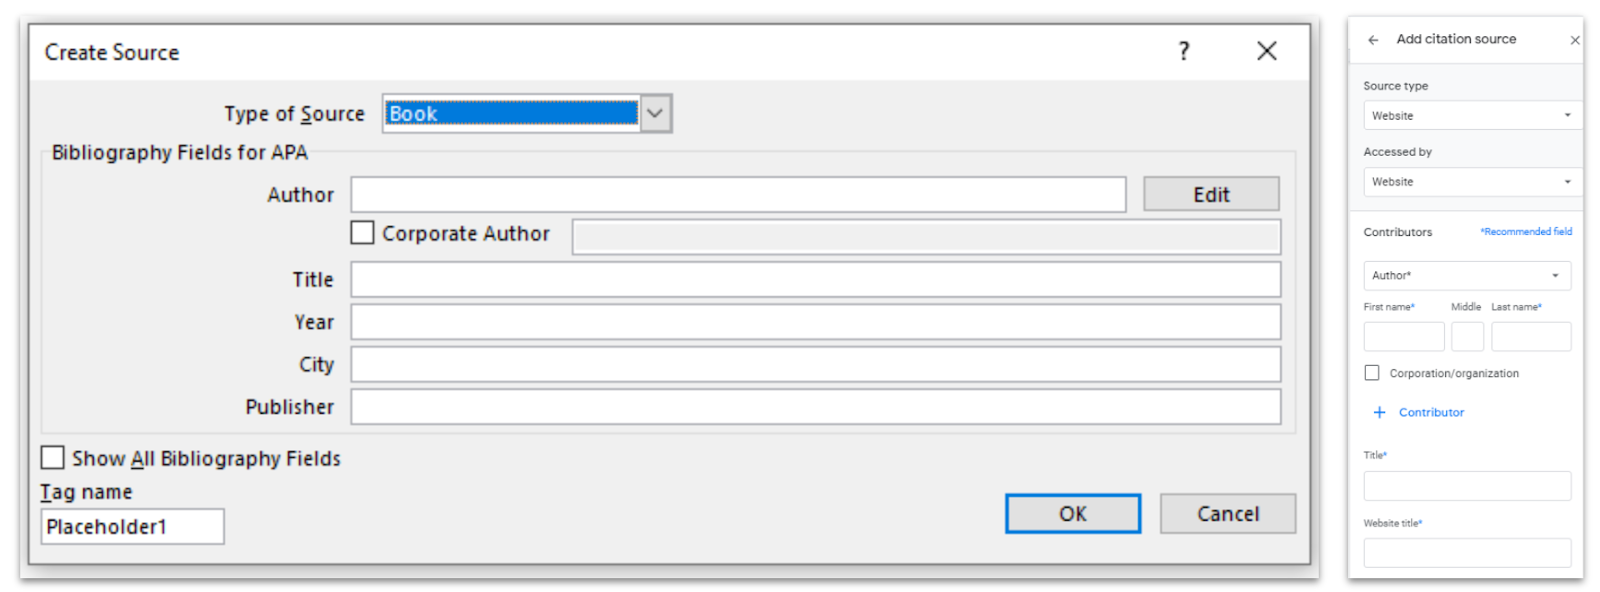
- Citations: Google and Microsoft both offer integrated citation generators. In Google Docs, you will find this under the Tools menu, while in Microsoft Word, it is located under the References tab. Use these tools to keep track of the sources that you are using in your writing.
Explore add-ons, extensions, and other digital tools.
While it’s a good idea to become proficient with the integrated tools first, don’t stop there. There are increasing numbers of add-ons, extensions, and companion websites that can be very helpful to you while writing. Microsoft offers add-ins through their AppSource. Google Docs and Google Chrome offer the largest selection of additional options through their Workspace Marketplace. Here are a few tools to get you started.
- Reference
- OneLook: This Google Docs add-on gives you a quickly accessible thesaurus that pops up on the right side of your word processor. It can help students find synonyms, related words, rhymes, and more. Again, this tool is often integrated into the standard program, but this add-on can provide additional ideas.
- Describing Words: This website helps you find adjectives for any word you enter.
- Google Explore Tool: Use this integrated Google tool to expand on an idea by doing a quick search for ideas, websites, and images.
- Special Characters
- MathType: This Google Slides and Docs add-on allows you to type math equations and chemical formulas. There is also a Microsoft version available.
- Easy Accent Marks: Use this Google Chrome extension to easily add language accent marks to typed text. Choose from 15 languages.
- Flat for Docs: Add musical characters and notations with this Google Docs and Slides add-on.
- Icons for Slides and Docs: This add-on offers over 2.5 million free, customizable icons for Google Docs, Slides, Sheets, and Forms.
- Accessibility
- BeeLine Reader: Use this Google Chrome extension to change the look of online fonts to assist readers with dyslexia.
- Google Docs Offline: This add-on allows students to use Google Docs when the internet is not available.
- Citations
- Citation Machine, Cite This For Me, and EasyBib: These popular citation generators are separate websites that can be used as you prepare your bibliography, works cited, or references page.
- Plagiarism
- The Purdue Online Writing Lab (OWL): This comprehensive website offers resources to help teach students the concept of plagiarism and strategies for avoiding it in their writing.
- Turnitin: This is a paid product that allows teachers and students to scan their writing for potential plagiarism.
- Google Assignments: The free version of this tool offers three plagiarism checks for free, and it can be integrated into some learning management systems.
Extend Your Learning
- Writing Center: Online Resources (Amherst College)
- The Purdue Online Writing Lab (Purdue University)
- Strunk and White: 11 Composition Principles (Gotham Writers)
- Teaching Elementary School Students to Be Effective Writers (Reading Rockets)