As educators, we know how important student organization is to their educational success. Traditionally, we have helped our students learn to organize their papers into folders and three-ring binders, and for younger students, we even help them organize the materials in their desks and lockers. We also know how important it is for them to collect exemplars of their work, so they can reflect upon, share, and celebrate their learning growth. With an increase of tech-empowered classrooms and remote-learning environments, this need to teach students best practices for organizing their classwork, resources, and finished projects/performances now extends to the digital realm.
For students to learn these best practices, we need to be intentional in teaching them strategies and tools for managing their digital materials. We cannot assume that students will figure it out for themselves, so we need to provide direct instruction as well as model these best practices for our students. This instruction can be integrated into other digital study skill lessons, such as helping students to manage their digital environment, establish a study space and routine, develop time management skills, and develop their growth mindset.
Strategies and digital tools that students can use to manage their many digital materials are included below. These strategies are platform and device agnostic. They are written with the older student as the intended audience, so you may share them directly with your students. To teach younger students these skills, you can reference these strategies and resources to design age-appropriate lessons and materials. In fact, these digital organization strategies and tools are useful to educators as we manage and share our many digital resources and materials.
Consider sharing these convenient summary flyers with your students and families:
Best Practices and Digital Tools to Effectively Organize Your Materials
As a learner, you will be collecting, creating, and sharing many files for your different classes. When you create a strong organizational system for storing these files, you will then be able to locate and access them more quickly.
Essential Skills
- Create and name files.
- Create and name folders.
- Organize files and folders.
- Search for files and folders.
Best Practices for Managing Your Digital Files
-
Use file-naming conventions.
-
- Use unique and descriptive titles for all files.
- Select titles that reflect the file’s content, so you won’t have to open the file to know what is in it.
- Be consistent in naming your files. For example, add the class in brackets at the end of the file name (Digital Citizenship Debate Notes [ELA]).
- Consider key words that will aid you in searching for the files later.
-
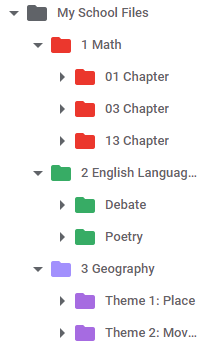
Create and organize folders.
- Develop an organizational structure. For example, create a folder for each of your classes with subfolders for each chapter or unit.
- Avoid creating too many folder layers.
- Name the folders so that they appear in a logical order.
- 1, 2, 3 comes before A, B, C in the listing order of files and folders. If you are using numbers that will go to double digits, place a 0 in front of the single digit numbers (for example, use 01 to avoid 11 being listed before 1).
- You can leverage this ordering system to name folders and files in a manner that best suits your needs. For example, you could number the folders to appear in the order of your class periods.
- Make folders so that you can quickly scan for them. For example, use concise folder names and add color to folders.
- Make a habit of placing all your materials into these folders as you gather and create them.
- Save all your files to this folder system. Include files shared with you by others. Avoid keeping some files on your device and some in your cloud Drive. Store all of them in your cloud Drive.
- Routinely clean out files that you are certain you will no longer need. If at all uncertain, keep the file.
- Develop an organizational structure. For example, create a folder for each of your classes with subfolders for each chapter or unit.
-
Use search and/or filter features to locate files and folders.
-
- Leverage the search tools available to locate files on your device or cloud storage.
- Use keywords in your search.
- Use filter options to narrow your search by owner, file type, date, etc.
Bonus Tip: If your files are in cloud storage, like Google Drive or Microsoft OneDrive, you can also bookmark/favorite them to give yourself another quick access point.
See the Organize Your Materials: eFiles flyer.
Along with developing a file management system, another way to organize your digital resources is to create an eBinder. Using an eBinder allows you to collect and organize all your materials in a manner that best serves your learning needs, since organization of materials in an eBinder is not restricted to an alphabetical order. Depending upon the eBinder tool you use, you can include digital text, images, audio, and/or videos, as well as pictures or recordings of your offline work. By collecting your materials in an eBinder, you will then be better able to revisit resources to aid you when recollecting, reflecting, and sharing your learning.
Essential Skills
- Select an eBinder tool.
- Create and organize an eBinder.
- Use an eBinder to collect, recollect, and reflect on the learning journey.
Best Practices for Creating and Using eBinders
-
Select a digital eBinder tool.
-
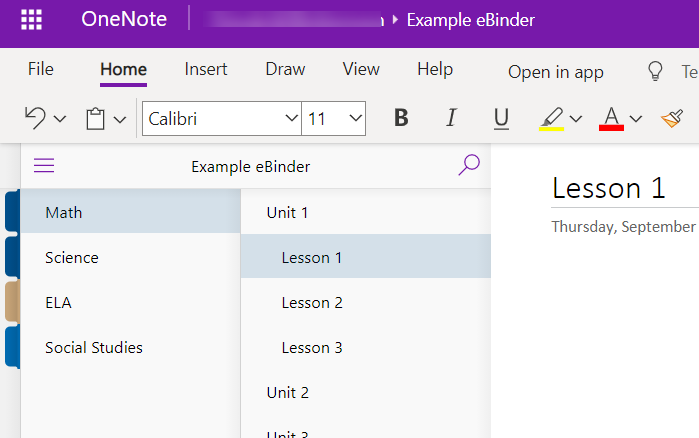
- Explore your options and select a tool that best suits your device and learning needs. Popular tools for eBinders include Google Sites (Tips), Microsoft OneNote, Google Slides, Microsoft PowerPoint, Google Keep, and Seesaw. For more tool ideas, see these recommendations from Common Sense Education.
- Use a template to save you setup time. Here are some templates to get you started:
- Google Sites and Microsoft OneNote: AVID Templates
- Google Slides and Microsoft PowerPoint: SlidesMania Templates
-
Set up an organizational system.
-
- Develop an organizational structure. For example, create an eBinder for each class, with sections for each chapter or unit. Alternatively, you can use one eBinder, with a section for each class that has pages for each chapter or unit.
- For your pages, set up a consistent layout that supports your learning needs. For example, design a layout that includes placeholders for the learning question/target/objective, your notes, class documents, your learning artifacts, and your reflection.
-
Use the eBinder to collect, recollect, and reflect on the learning journey.
-
- Make a habit of placing and organizing all your materials into your eBinder as you gather and create them.
- Routinely revisit the materials in your eBinder as you study. The more times you revisit and interact with your learning materials, the better your brain will recall your new knowledge and skills. Reference these materials as you apply your new skills.
- Use your eBinder to also reflect upon your learning journey. It is most powerful to reflect on both the process and product of your learning. What are your key learning takeaways? What study strategies did you leverage that worked for you? What can you do differently and improve upon for next time?
See the Organize Your Materials: eBinders flyer.
An ePortfolio is a collection of your finished projects and/or performances that provides evidence of your knowledge and skills. ePortfolios can show your growth over time and be used to reflect on your learning journey. They can also be shared with family, employers, or colleges to celebrate or highlight your achievements.
Many of the same digital tools and strategies for the eBinder can be applied to the ePortfolio. The main difference is that the eBinder is used to support your studying and learning, while the ePortfolio is intended to be shared with others to highlight your achievements (also known as “Wow Work”).
Essential Skills
- Select an ePortfolio tool.
- Create and effectively design an ePortfolio.
- Use the ePortfolio to highlight, share, and reflect upon best work.
Best Practices for Creating and Using ePortfolios
-
Select a digital ePortfolio tool.
- Explore your options and select a tool that best highlights your projects and performances that demonstrate your knowledge and skills. Many of the same eBinder tools can also be used for ePortfolios: Google Sites (Tips), Microsoft OneNote, Google Slides, Microsoft PowerPoint, and Seesaw. For more tool ideas, see these recommendations from Common Sense Education.
-
Set up and design your ePortfolio.
- Consider your intended purpose and audience. For example, your art ePortfolio to share as part of a virtual gallery walk for Open House will most likely need to be designed and organized differently than the ePortfolio you submit as part of your college application.
- Select a title, font style, layout, and color theme that reflects your purpose. Use these styles consistently throughout the ePortfolio.
- Develop an organizational structure that will highlight your work. For example, create a table of contents or navigation bar that links to sections or pages for each type of project or performance.
- Include an introduction of both yourself and the purpose of your ePortfolio.
- For each project/performance page, include a title, your best work, and an explanation or reflection statement. Incorporate hyperlinks and multimedia (text, images, audio, and/or video) that best highlights your work.
- Seek feedback from peers, teachers, and family. Add them as editors to leave comments and suggestions.
- Revise and polish your ePortfolio.
-
Publish and share your ePortfolio.
-
- Share your finished ePortfolio with your intended audience.
- Use your ePortfolio to also reflect upon your learning and develop your growth mindset. It is most powerful to reflect on both the process and product of your learning.
- How have your knowledge and skills grown over time?
- What strategies did you leverage that worked for you?
- What can you do differently and improve upon for next time?
- What are your next steps to continue developing your skills and knowledge?
- What are your future goals for using these skills?
See the Share Your Learning: ePortfolios flyer.
Related AVID Open Access Articles
- Establish Digital Study Spaces and Routines
- Develop Your Students’ Time Management Skills
- Learn and Manage Your Digital Learning Environment
- Start the Year by Fostering Your Students’ Growth Mindset
Extend Your Learning
- How to Create Powerful Student ePortfolios With Google Sites (Shake Up Learning)
- Applied Digital Skills: Build a Portfolio With Google Sites (Google for Education)
- OneNote Class Notebook as an e-Portfolio (Microsoft)
- OneNote Class Notebook: A Digital Binder That Will Change the Way You Teach (Cult of Pedagogy)